The Island Course
Designer: Joe Finger
Hole No. 6 selected by Golf Course Architects Society of America as the National Hole of the Year; Hole No. 18 recognized by Golf Digest as …
Hole No. 6 selected by Golf Course Architects Society of America as the National Hole of the Year; Hole No. 18 recognized by Golf Digest as Golf’s Toughest Finishing Hole ; Ranked as one of the top 50 courses in Texas by the Dallas Morning News ; Hole No. 18 receives recognition every year by the Dallas Morning News as one of 18 Texas golf holes considered to be the toughest in the state
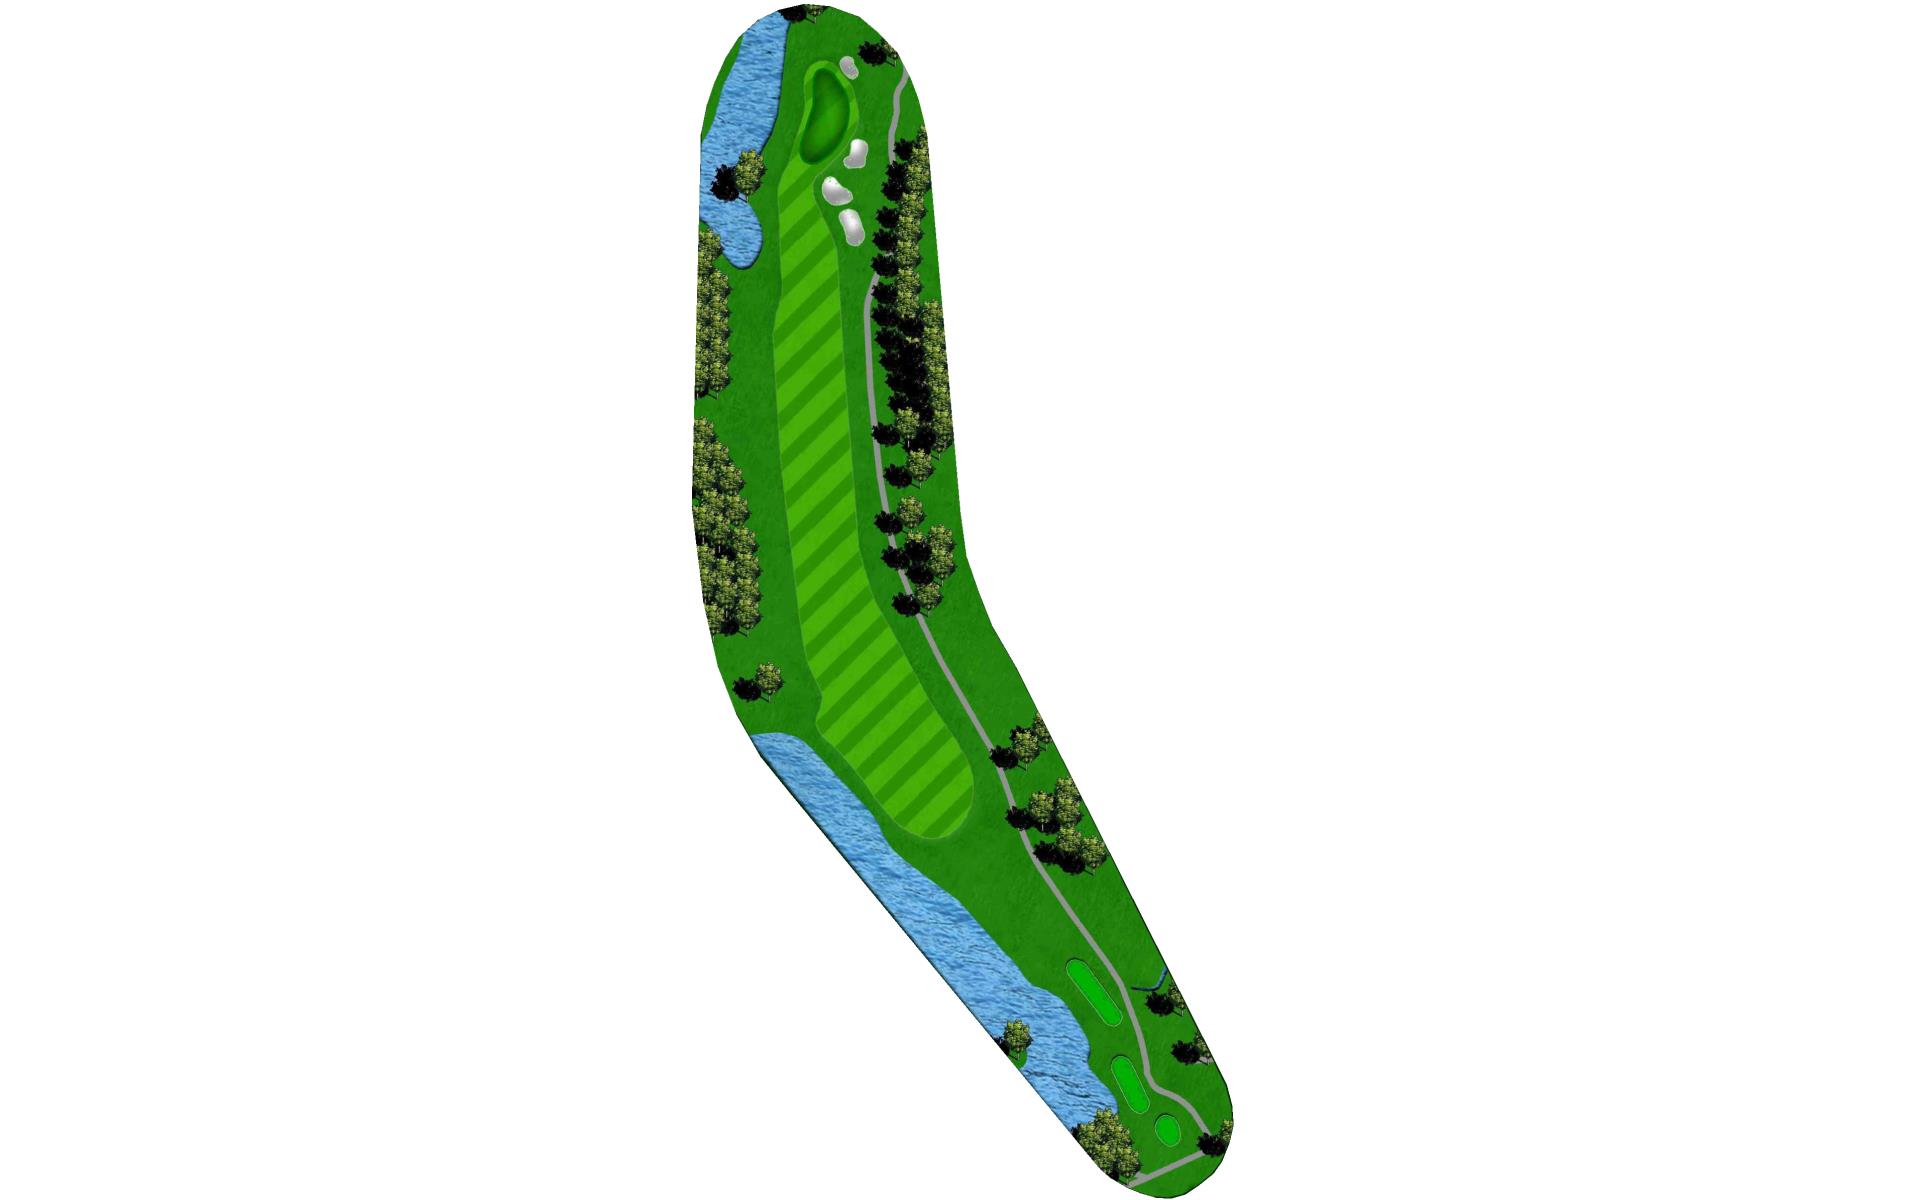
# 1 /
Par: 5
Handicaps:
Men's 12
Women's 12
Yardage by Tee:
GOLD 514
BLUE 482
WHITE 447
SILVER 427
Slope:
Gold 135 | Blue 128 | White 124 | Silver 118
Pro Tips
Starting with an intimidating looking tee shot of this Par 5 with the driving range serving as OB on the right and a pond on the left. The hole gently doglegs left with bunkers left of the green and another pond right of the green.

# 2 /
Par: 4
Handicaps:
Men's 10
Women's 10
Yardage by Tee:
GOLD 412
BLUE 380
WHITE 350
SILVER 334
Slope:
Gold 135 | Blue 128 | White 124 | Silver 118
Pro Tips
Par 4 with trees that jet out across the right side of the fairway just enough to snag slightly errant tee shots. Other than that, this hole is slightly uphill for the approach and nothing else to worry about.

# 3 /
Par: 3
Handicaps:
Men's 18
Women's 18
Yardage by Tee:
GOLD 168
BLUE 130
WHITE 117
SILVER 88
Slope:
Gold 135 | Blue 128 | White 124 | Silver 118
Pro Tips
The first Par 3 with a deep green that has some tricky slopes. Do not leave yourself a downhill put here.

# 4 /
Par: 4
Handicaps:
Men's 14
Women's 4
Yardage by Tee:
GOLD 407
BLUE 381
WHITE 356
SILVER 325
Slope:
Gold 135 | Blue 128 | White 124 | Silver 118
Pro Tips
Par 4 that gently doglegs right. A long fairway bunker down the right side of the fairway discourages players from attempting to cut off the dogleg. A narrow green protected by bunkers requires a shot with precise distance control.

# 5 /
Par: 4
Handicaps:
Men's 6
Women's 2
Yardage by Tee:
GOLD 395
BLUE 370
WHITE 355
SILVER 316
Slope:
Gold 135 | Blue 128 | White 124 | Silver 118
Pro Tips
This Par 4 entices players to try and cover as much of the water as possible to leave the shortest approach possible, but be warned, little gusts of wind have been known to make many balls splash causing golfer’s hopes for a hot start to be crashed.

# 6 /
Par: 5
Handicaps:
Men's 8
Women's 8
Yardage by Tee:
GOLD 568
BLUE 520
WHITE 490
SILVER 410
Slope:
Gold 135 | Blue 128 | White 124 | Silver 118
Pro Tips
The second Par 5 is best navigated by having a plan in place already. The tee shot gives you a lot to look at with water and trees. The longer hitters will try to sneak their tee shot past a cluster of trees in the middle of the fairway leaving a mid-iron approach over water however be careful not to run through the fairway and into the water. If avoiding the water at all costs is your plan, then precise shots around the dogleg left is the best play.

# 7 /
Par: 4
Handicaps:
Men's 2
Women's 6
Yardage by Tee:
GOLD 430
BLUE 407
WHITE 393
SILVER 349
Slope:
Gold 135 | Blue 128 | White 124 | Silver 118
Pro Tips
Par 4 with trees that narrow the fairway right where most golfers would land their tee shots. The hole runs straight though and once in the fairway a straightforward approach awaits.

# 8 /
Par: 3
Handicaps:
Men's 16
Women's 16
Yardage by Tee:
GOLD 194
BLUE 172
WHITE 130
SILVER 120
Slope:
Gold 135 | Blue 128 | White 124 | Silver 118
Pro Tips
A lot to look at on this Par 3, water and bunkers guard this green making club selection and commitment a premium. Also don’t forget to check the wind!

# 9 /
Par: 4
Handicaps:
Men's 4
Women's 14
Yardage by Tee:
GOLD 451
BLUE 430
WHITE 420
SILVER 403
Slope:
Gold 135 | Blue 128 | White 124 | Silver 118
Pro Tips
On a course filled with demanding tee shots this Par 4 is no different. A slight dogleg left with a big pond down the left forces players to either risk the water off the tee or accept a long approach to a green surrounded by bunkers and water left.

# 10 /
Par: 4
Handicaps:
Men's 5
Women's 5
Yardage by Tee:
GOLD 446
BLUE 411
WHITE 402
SILVER 354
Slope:
Gold 135 | Blue 128 | White 124 | Silver 118
Pro Tips
Starting off the back 9 is a Par 4 that doglegs left. This hole is on the longer more difficult side so do not be discouraged by a hiccup here.

# 11 /
Par: 5
Handicaps:
Men's 7
Women's 3
Yardage by Tee:
GOLD 583
BLUE 569
WHITE 558
SILVER 486
Slope:
Gold 135 | Blue 128 | White 124 | Silver 118
Pro Tips
Par 5 with water all down the left side, only the bravest and longest of hitters will attempt this green in two, the prudent play is to place the ball down the right side of the fairway and past a group of trees guarding the front of the green.

# 12 /
Par: 3
Handicaps:
Men's 17
Women's 17
Yardage by Tee:
GOLD 186
BLUE 170
WHITE 154
SILVER 144
Slope:
Gold 135 | Blue 128 | White 124 | Silver 118
Pro Tips
Par 3 with a long narrow green.

# 13 /
Par: 4
Handicaps:
Men's 13
Women's 11
Yardage by Tee:
GOLD 419
BLUE 386
WHITE 366
SILVER 332
Slope:
Gold 135 | Blue 128 | White 124 | Silver 118
Pro Tips
Sharp dogleg left Par 4 here. Be aware of fairway bunkers that catch balls running through the fairway.

# 14 /
Par: 4
Handicaps:
Men's 11
Women's 9
Yardage by Tee:
GOLD 410
BLUE 381
WHITE 360
SILVER 340
Slope:
Gold 135 | Blue 128 | White 124 | Silver 118
Pro Tips
A nice reprieve here in the form of a gentle dogleg right with no immediate danger. Fire away and take dead aim.

# 15 /
Par: 4
Handicaps:
Men's 3
Women's 13
Yardage by Tee:
GOLD 461
BLUE 445
WHITE 430
SILVER 402
Slope:
Gold 135 | Blue 128 | White 124 | Silver 118
Pro Tips
A long Par 4 that longer hitter may need to be aware of a creek that cuts through the middle of the fairway.

# 16 /
Par: 4
Handicaps:
Men's 9
Women's 7
Yardage by Tee:
GOLD 413
BLUE 388
WHITE 368
SILVER 345
Slope:
Gold 135 | Blue 128 | White 124 | Silver 118
Pro Tips
Par 4 with water all down the left and a strategically placed bunker on the right. The fairway narrows significantly after the fairway bunker.

# 17 /
Par: 3
Handicaps:
Men's 15
Women's 15
Yardage by Tee:
GOLD 224
BLUE 200
WHITE 175
SILVER 144
Slope:
Gold 135 | Blue 128 | White 124 | Silver 118
Pro Tips
Long Par 3 with a long narrow green.

# 18 /
Par: 5
Handicaps:
Men's 1
Women's 1
Yardage by Tee:
GOLD 572
BLUE 555
WHITE 536
SILVER 502
Slope:
Gold 135 | Blue 128 | White 124 | Silver 118
Pro Tips
This is it, the “Tin Cup” pelican hole! The final hole is a Par 5 that gives many different options. A big pond creates two landing areas for the tee shot. To the left is a forced carry over the water that requires a long and accurate tee shot. To the right means no water but there is a big fairway bunker. No matter which route you take off the tee, the namesake Island green awaits. Be sure to check out the statue of the famous pelican from the bar scene out of the movie “Tin Cup” that is perched on the bulkheads on the water’s edge.