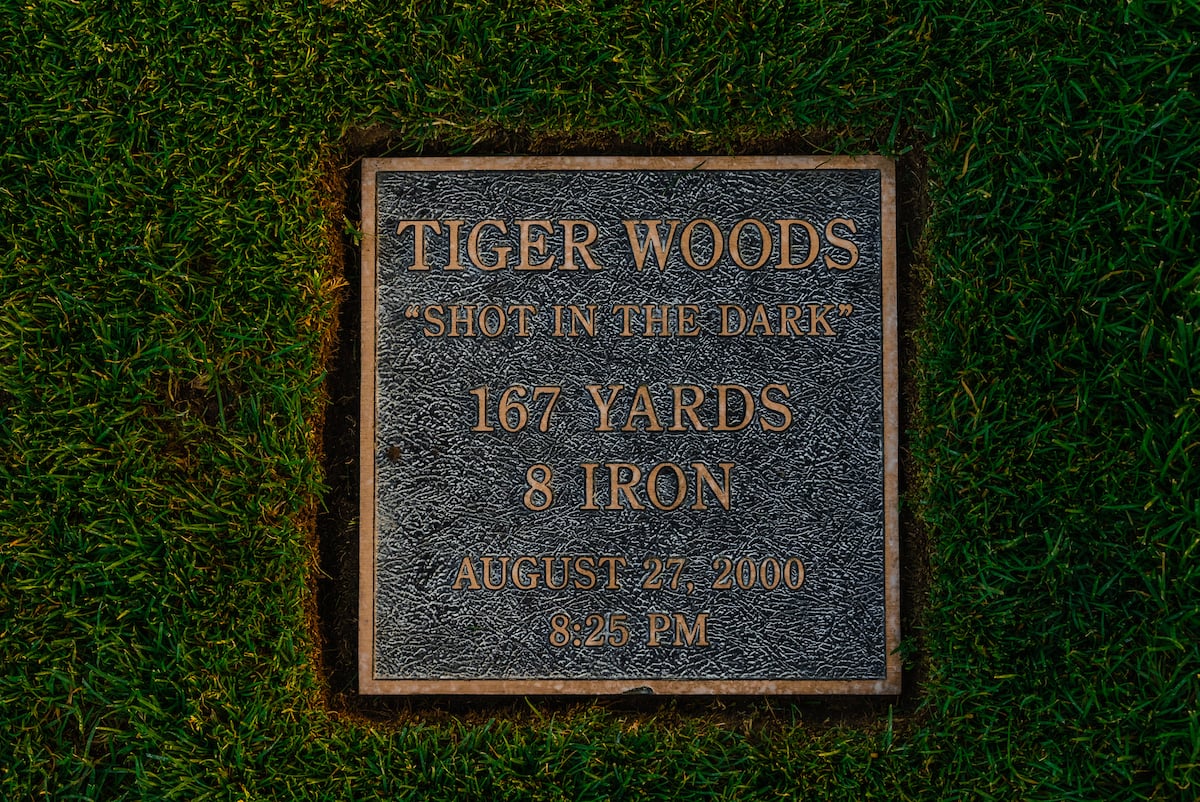
COURSE INFO

On the South Course, expect narrow fairways that punish errant drives, deep bunkers guarding approaches, and strategic shotmaking from tee to green. The layout demands both length and precision, with forces you to balance aggression and caution. Pro tip: The back nine surfaces traps and tricky green complexes which can derail momentum if you’re not careful.

Holes: 18  Par: 70  Rating: 76.1  Slope: 132  Yardage: 7,400

HOLE-BY-HOLE

1st Hole

Par 4 · 399

Pro’s Tip:
A shorter Par 4 that demands accuracy over length. Sitting 372 yards away from the Member's tee, is a well bunkered elevated green with a severe false front. The Fairway is tightly lined with trees and four fairway bunkers; hitting the fairway is important in order to score.

Tee 1: 399

Tee 2: 399

Tee 3: 372

Tee 4: 372

Tee 5: 275

2nd Hole

Par 5 · 526

Pro’s Tip:
The only Par 5 on the front nine is all up hill with a well guarded 3-tier-green. Fairway bunkers and tall trees line the sides the length of the fairway. A tee shot in the fairway sets up well for a scoring opportunity. The green itself is not easy. Four deep bunkers guard a severely undulated green with mean run-offs. If you are not careful on the green, you may easily putt it off. This hole is best played as a 3 shot hole.

Tee 1: 526

Tee 2: 526

Tee 3: 478

Tee 4: 478

Tee 5: 395

3rd Hole

Par 4 · 442

Pro’s Tip:
A short Par 4 well protected by a large pond, deep bunkers and high over hanging trees. A tee shot favoring the right side of the fairway will have the best angle into this green. Any shot outside of the fairway will have a tough time hitting the green in regulation.

Tee 1: 442

Tee 2: 369

Tee 3: 369

Tee 4: 323

Tee 5: 323

4th Hole

Par 4 · 471

Pro’s Tip:
Another demanding tee shot is required on the Par 4 fourth hole. An ideal tee shot lands in the right side of the severely sloping fairway and letting the ball roll to the flat area on the left. With trees lining the fairways and a large bunker on the right side, it is important to hit the fairway to try and score. A tricky green with subtle breaks and run-offs require a lot of attention to avoid a three putt.

Tee 1: 471

Tee 2: 471

Tee 3: 366

Tee 4: 366

Tee 5: 270

5th Hole

Par 3 · 200

Pro’s Tip:
The first of two Par 3s on the front nine plays around 180 yards from the Member tees. Three tough bunkers protect the front and left side of the green while tall trees guard the right side and long of the green. A narrow but long green slopes hard from right to left. If not careful on the green, a three-putt could be in play.

Tee 1: 200

Tee 2: 200

Tee 3: 182

Tee 4: 171

Tee 5: 154

6th Hole

Par 4 · 469

Pro’s Tip:
The number one Handicap hole on the course is the Par 4 6th, slight dogleg sitting at 415 yards from the Members tee. This hole is shaped left to right and requires a tee shot in the fairway to have a good look at the long green. Trees down both sides play a factor for any tee shot that is not in the fairway. Three bunkers guard the left-right sloping green. It is best to leave the approach shot below the hole to have a good chance at the putt.

Tee 1: 469

Tee 2: 413

Tee 3: 413

Tee 4: 413

Tee 5: 275

7th Hole

Par 3 · 219

Pro’s Tip:
This Par 3 7th plays shorter from the Member's tee at around 150 yards. The shorter distance does not make the hole any easier as it is guarded by 4 greenside bunkers, one of which runs the whole left side of the green. It is important to hit the large green to avoid a tough up and down for par. The massive green provides many tough hole locations; all of which will serve you better playing from below the hole.

Tee 1: 219

Tee 2: 219

Tee 3: 147

Tee 4: 147

Tee 5: 138

8th Hole

Par 4 · 482

Pro’s Tip:
The Par 4 8th is another slight left-right dogleg with a left-right sloping fairway. In order to keep it in the short grass, a tee shot on the left side of the fairway is ideal. With tall and thick trees down the right side, the best miss is to the left in order to have a look at the green. The green is guarded by five deep bunkers and a severe run off over the back of the green. The green runs hard front-back. Shots that land short of the green, tend to roll on and trickle towards the pin.

Tee 1: 482

Tee 2: 420

Tee 3: 420

Tee 4: 420

Tee 5: 296

9th Hole

Par 4 · 494

Pro’s Tip:
This straight but long Par 4th closes out the front nine at the base of the clubhouse. A tee shot in the fairway is the best chance to attack this tricky protected green. Three deep bunkers surround the green. The green itself has a severe false front as well as a couple of collection areas that will test your putting skills.

Tee 1: 494

Tee 2: 442

Tee 3: 442

Tee 4: 330

Tee 5: 330

10th Hole

Par 4 · 410

Pro’s Tip:
This uphill Par 4 plays just under 400 yards from the Member tee box. Three fairway bunkers guard the landing area. The ideal target line is the right edge of the left bunker. The approach shot is uphill into a tiered green. It is important to know where the pin is to not be above the hole.

Tee 1: 410

Tee 2: 410

Tee 3: 387

Tee 4: 336

Tee 5: 336

11th Hole

Par 4 · 418

Pro’s Tip:
Playing around 350 yards from the Member tee this Par 4 11th has a blind tee shot that requires more accuracy than distance. With tall trees lining the fairway and bunkers guarding the green, it is no easy hole. The green has a plateau on the left and runs left-right.

Tee 1: 418

Tee 2: 418

Tee 3: 345

Tee 4: 345

Tee 5: 255

12th Hole

Par 3 · 180

Pro’s Tip:
The first Par 3 on the back nine. Playing uphill, this green is heavily guarded by 3 bunkers; short, left and right. The best opportunity at making a putt is to be below the hole as the green slopes back to front.

Tee 1: 180

Tee 2: 165

Tee 3: 165

Tee 4: 153

Tee 5: 153

13th Hole

Par 4 · 471

Pro’s Tip:
This tough left-right dogleg requires a tee shot down the left center. A bunker sits on the left side of the fairway around 160 from the green. An overhanging tree protects the dogleg from being cut off on the right side. The approach to the elevated green is uphill and is well protected by deep bunkers left and right. The green itself is very tricky and is inviting to three putts if not careful. Add False front

Tee 1: 471

Tee 2: 471

Tee 3: 439

Tee 4: 355

Tee 5: 355

14th Hole

Par 4 · 467

Pro’s Tip:
This straight away Par 4 plays 370 yards from the member tees. Three bunkers line the fairway as well as tall trees. Being in the fairway provides the best chance at hitting the green. Accuracy is more important than distance off the tee. The green is narrow and has three greenside bunkers. The green is one of the flatter ones on the course.

Tee 1: 467

Tee 2: 371

Tee 3: 371

Tee 4: 371

Tee 5: 287

15th Hole

Par 3 · 221

Pro’s Tip:
The last Par 3 on the course plays around 160 yards from the Member tees. A large bunker sits on the front left of the green and two smaller ones on the right. This green slopes back to front with a few subtle run offs on the right side of the green. Being below the hole is the best opportunity at a birdie.

Tee 1: 221

Tee 2: 159

Tee 3: 159

Tee 4: 148

Tee 5: 148

16th Hole

Par 5 · 667

Pro’s Tip:
From the tips, The 16th Par 5, also known as the monster, plays at 675 yards. The tee shot on this hole is important to be inside the tree line of the fairway. On the left is high fescue and trees and the right is guarded by thick tall trees. A tee shot at the top of the hill on the right side of the fairway will launch the ball down the sloping fairway to add extra distance. Longer hitters can hit the slope to have under 300 yards in on the next shot. The green is guarded by a frontside pond and three bunkers behind and left of the green. Trying to attack the green in two is very tough and very risky. Laying up short of the pond on the second shot is the best play majority of the time. The turtle shell shaped green provides tough pin positions that can play tricky if not careful.

Tee 1: 667

Tee 2: 590

Tee 3: 590

Tee 4: 465

Tee 5: 465

17th Hole

Par 4 · 400

Pro’s Tip:
This uphill Par 4 plays just under 400 yards from the member tees. With 5 bunkers guarding left and right of the fairway, the tee shot can be intimidating. The green is protected by a deep pot bunker right in front of the green. The green is large and slopes hard back to front; putting from below the hole is best chance at a make. Be sure to look at #18 green while on #17 tee box to see where the pin location is.

Tee 1: 400

Tee 2: 400

Tee 3: 374

Tee 4: 333

Tee 5: 333

18th Hole

Par 4 · 464

Pro’s Tip:
This iconic finishing hole is lined on both sides by tall strong trees and a large fairway bunker on the right side. The hole starts straight but turns slightly left the closer you get to the hole. An ideal tee shot is down the right side of the fairway to have the best angle at the long tricky green. The hole could play about 25 yards different based on pin location. Four bunkers guard short and long of the green. Once on the green, pace is more important than the line itself as a couple putts can be very tough. Make sure to check out the Tiger Woods “Shot in the Dark” plaque down the right side of the fairway.

Tee 1: 464

Tee 2: 464

Tee 3: 435

Tee 4: 350

Tee 5: 350

“..., I’ve always been a fan of this golf course ever since I first played here in ’97 ... it’s always been one of my favorite golf courses on the entire Tour...”

Tiger Woods | PGA Professional

“Because of the history of the golf course, you really can feel it. It’s one of these courses where you can tell the tournament has got a little more of a buzz to it.”

Phil Mickelson | PGA PROFESSIONAL

“As a test, I always thought Firestone was strong… The par 4s are strong. You hit a shot in the rough and it’s even more difficult. I think it’s a really, really good test of golf.”

Jack Nicklaus | PGA PROFESSIONAL

Ready to Play?

We're ready to host you for a visit to Firestone Country Club. Reach out to our Membership Team to get started.

Join Firestone

Where exceptional golf sets the standard.

Explore Membership

FREQUENTLY ASKED QUESTIONS

Do I need to be a member to play golf at Firestone?
Yes, access to Firestone is for Members and their guests. Stay & Play packages are available for non-members. Select tournaments and corporate outings may allow limited guest play.
How many golf courses are available?
Firestone features three distinct 18-hole courses—the South, North, and Fazio—totaling 54 holes of championship play.
Do you offer golf lessons or clinics?
Yes. Firestone’s Professional Staff offers private instruction, group clinics, and specialized programs for Members and their guests using TrackMan technology and PGA-certified instruction.
Can I host a golf outing or corporate event?
Yes. Firestone is one of the nation’s premier destinations for group golf events, from corporate tournaments to charity fundraisers.
Is there a dress code?
Yes. Proper golf and clubhouse attire is required. Collared shirts and appropriate golf shorts or pants are expected on the course, and hats must be worn facing forward. Casual resort wear is welcome in dining areas unless otherwise noted.
Do you offer club fittings and rentals?
Yes. Our Professional Staff provides professional fittings to Members and their guests with TrackMan technology, along with premium men’s and women’s rental sets.
Can beginners play at Firestone?
Yes. While known for championship golf, Firestone welcomes players of all skill levels through guided instruction and flexible tee options.
What brands are available in the golf shop?
Firestone’s Golf Shop offers premium brands, including Titleist, Callaway, FootJoy, Peter Millar, and more, along with exclusive Firestone merchandise.