Regency Golf Course
Designer: Arnold Palmer
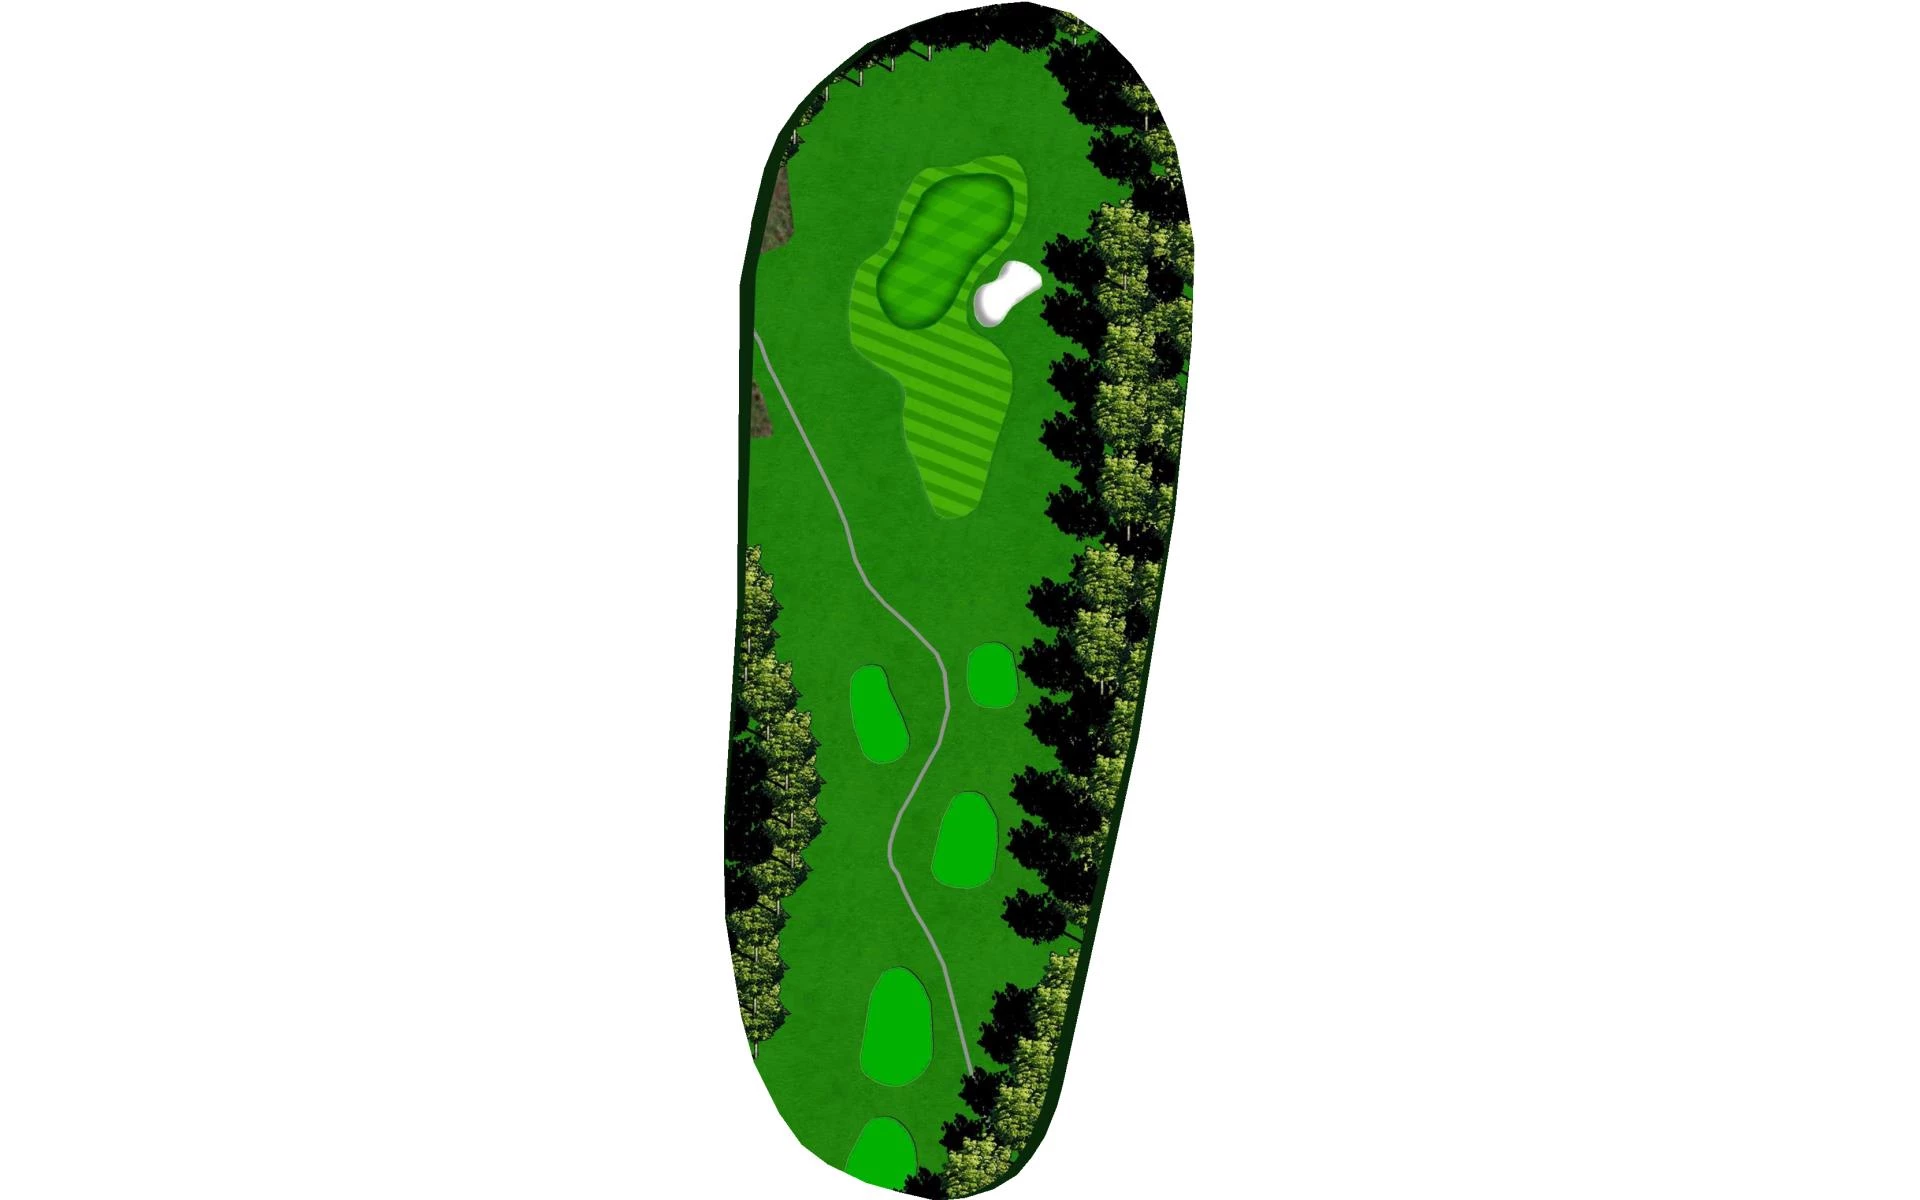
# 1 /
Par: 4
Handicaps:
Men's 8
Women's 6
Yardage by Tee:
GOLD 312
BLUE 295
WHITE 262
RED 262
Slope:
Gold-111 | Blue-107 | White-Men:102, Women:103 | Red-102
Pro Tips
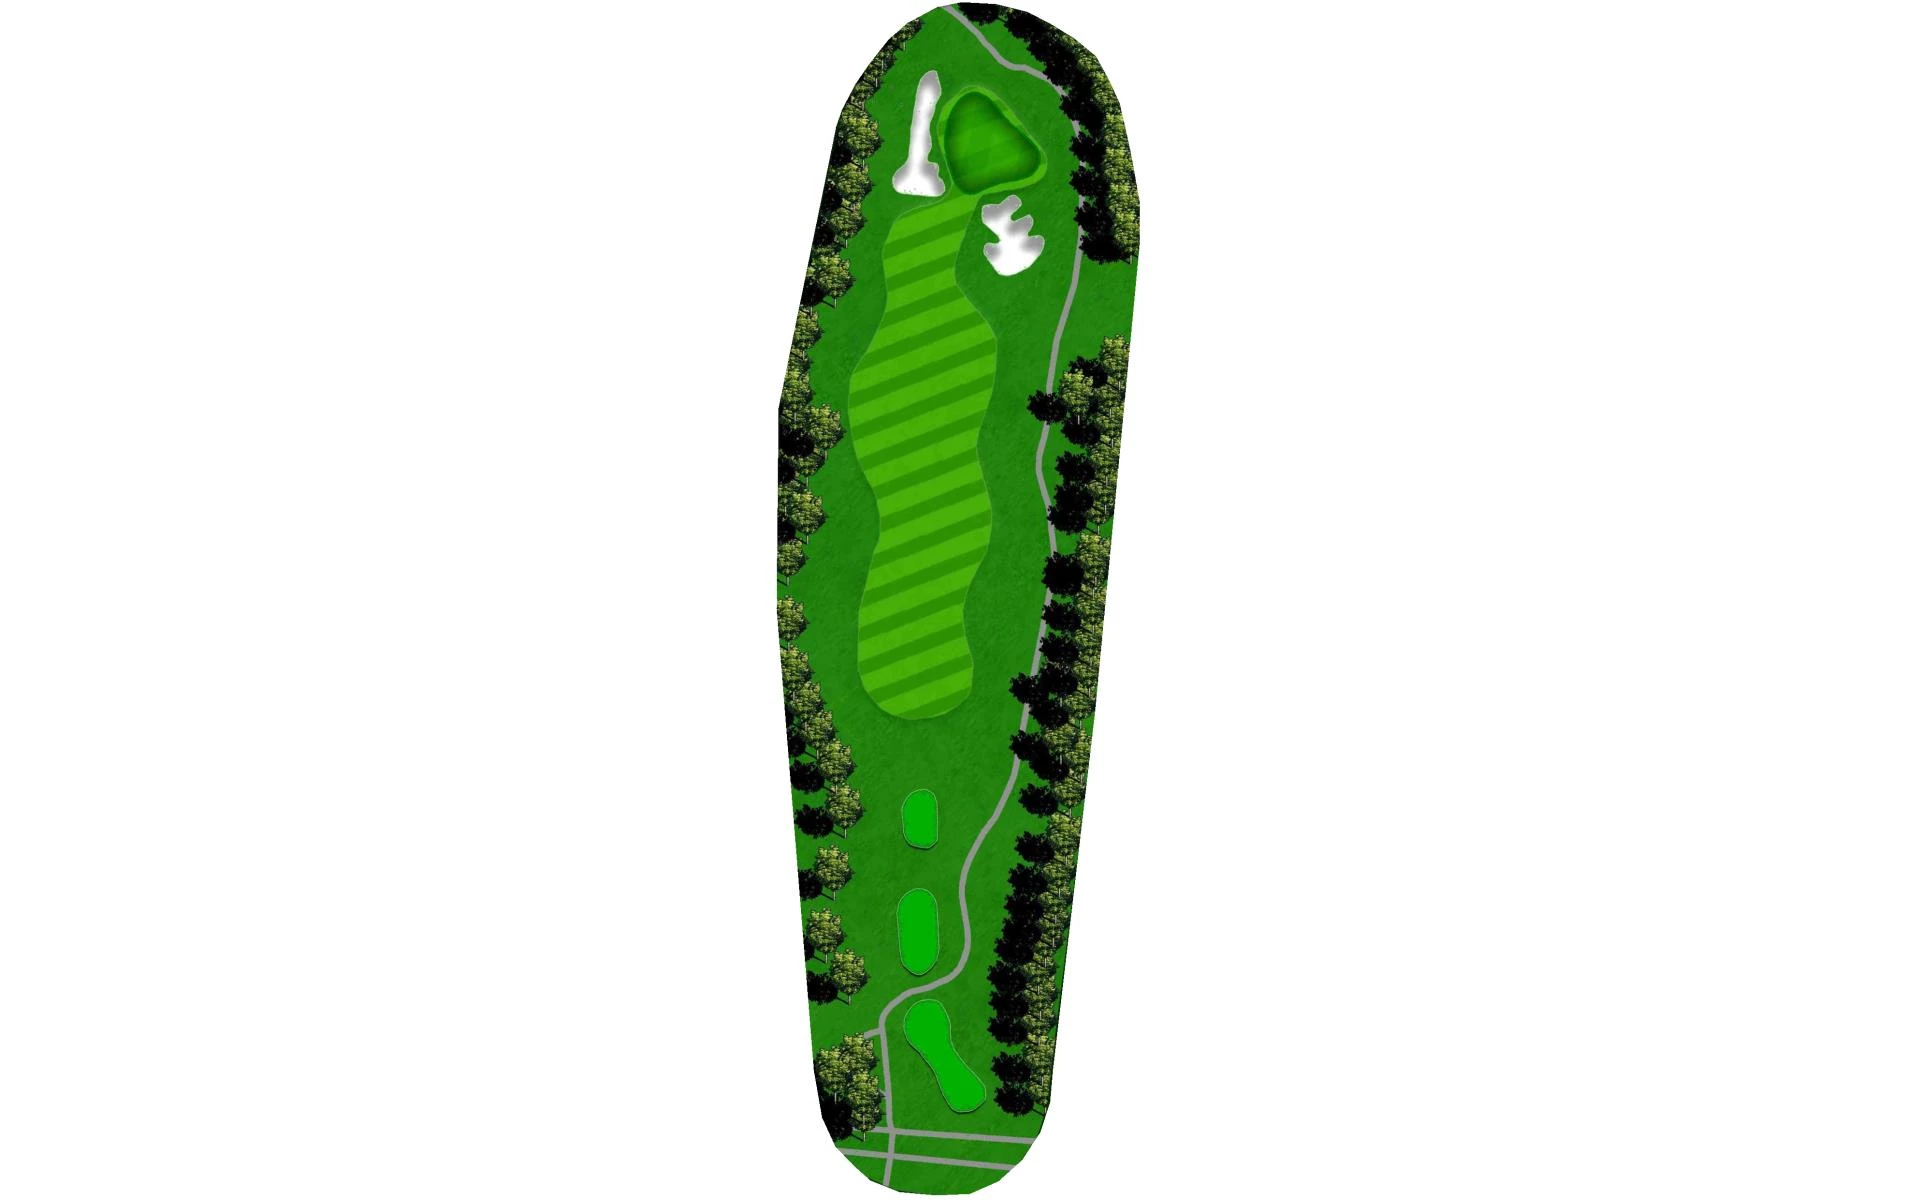
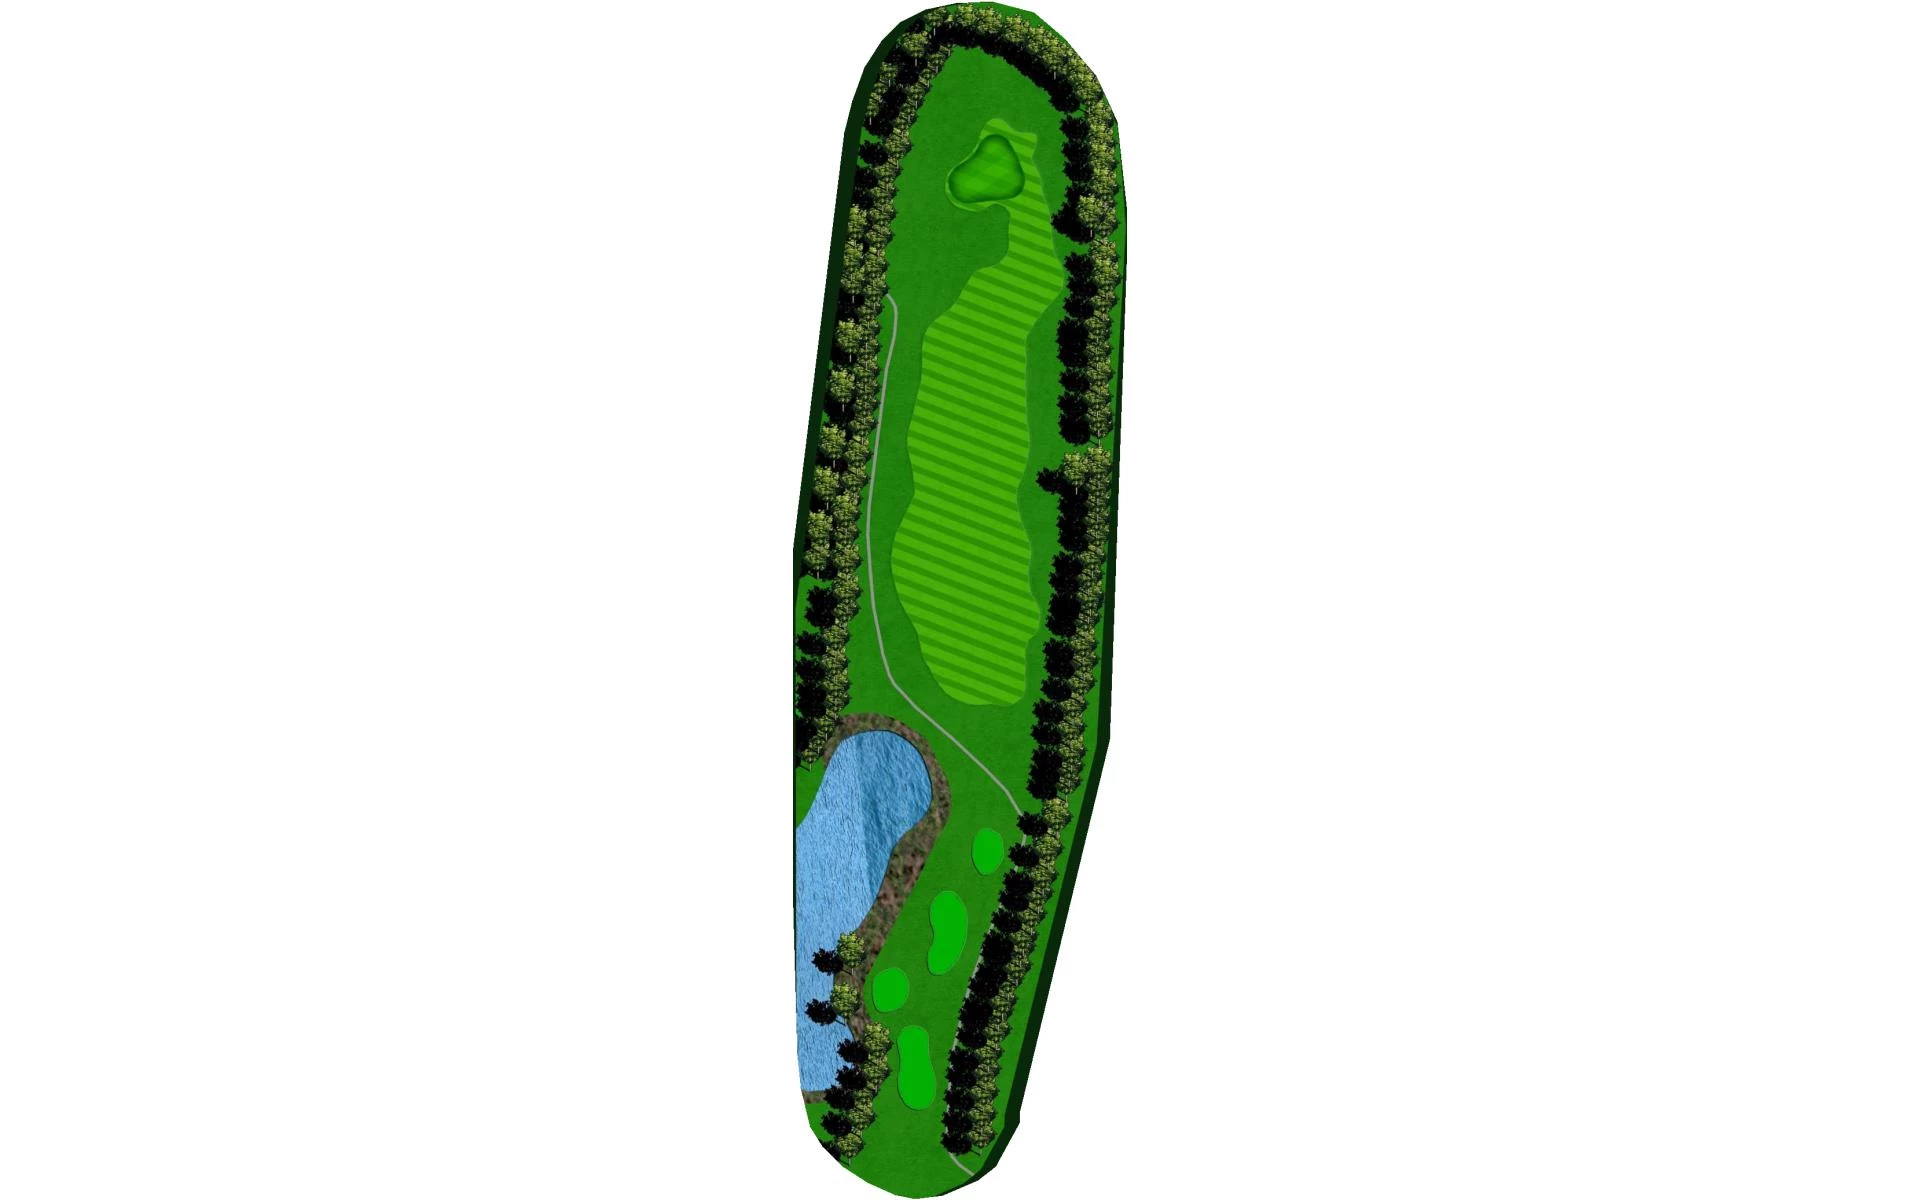
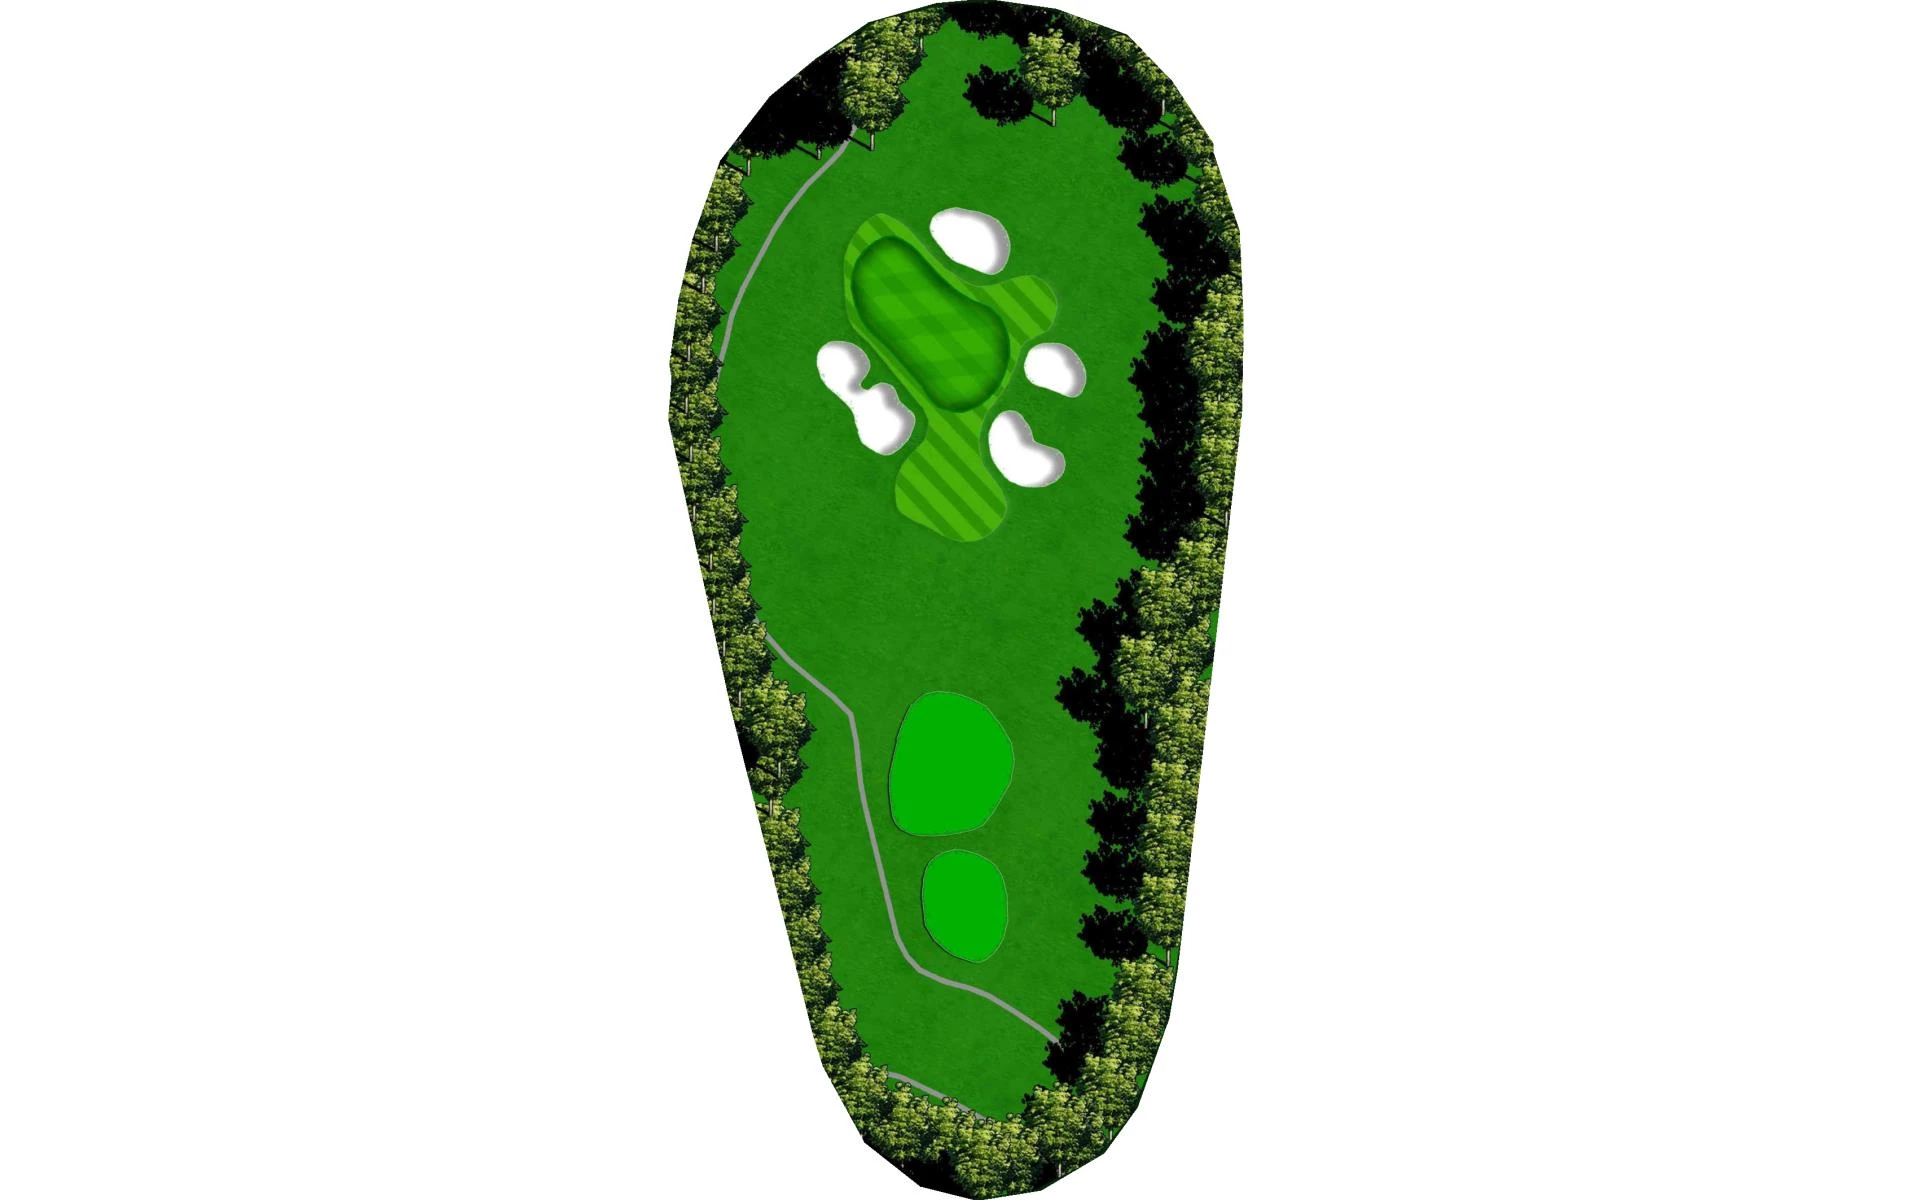
The first hole is a medium length straight away par 4 guarded by bunkers in both the front and left side of the green. Long hitters can definitely go for the green, but the smart play is to hit a 200 yard layup leaving yourself 100 yards to the green.
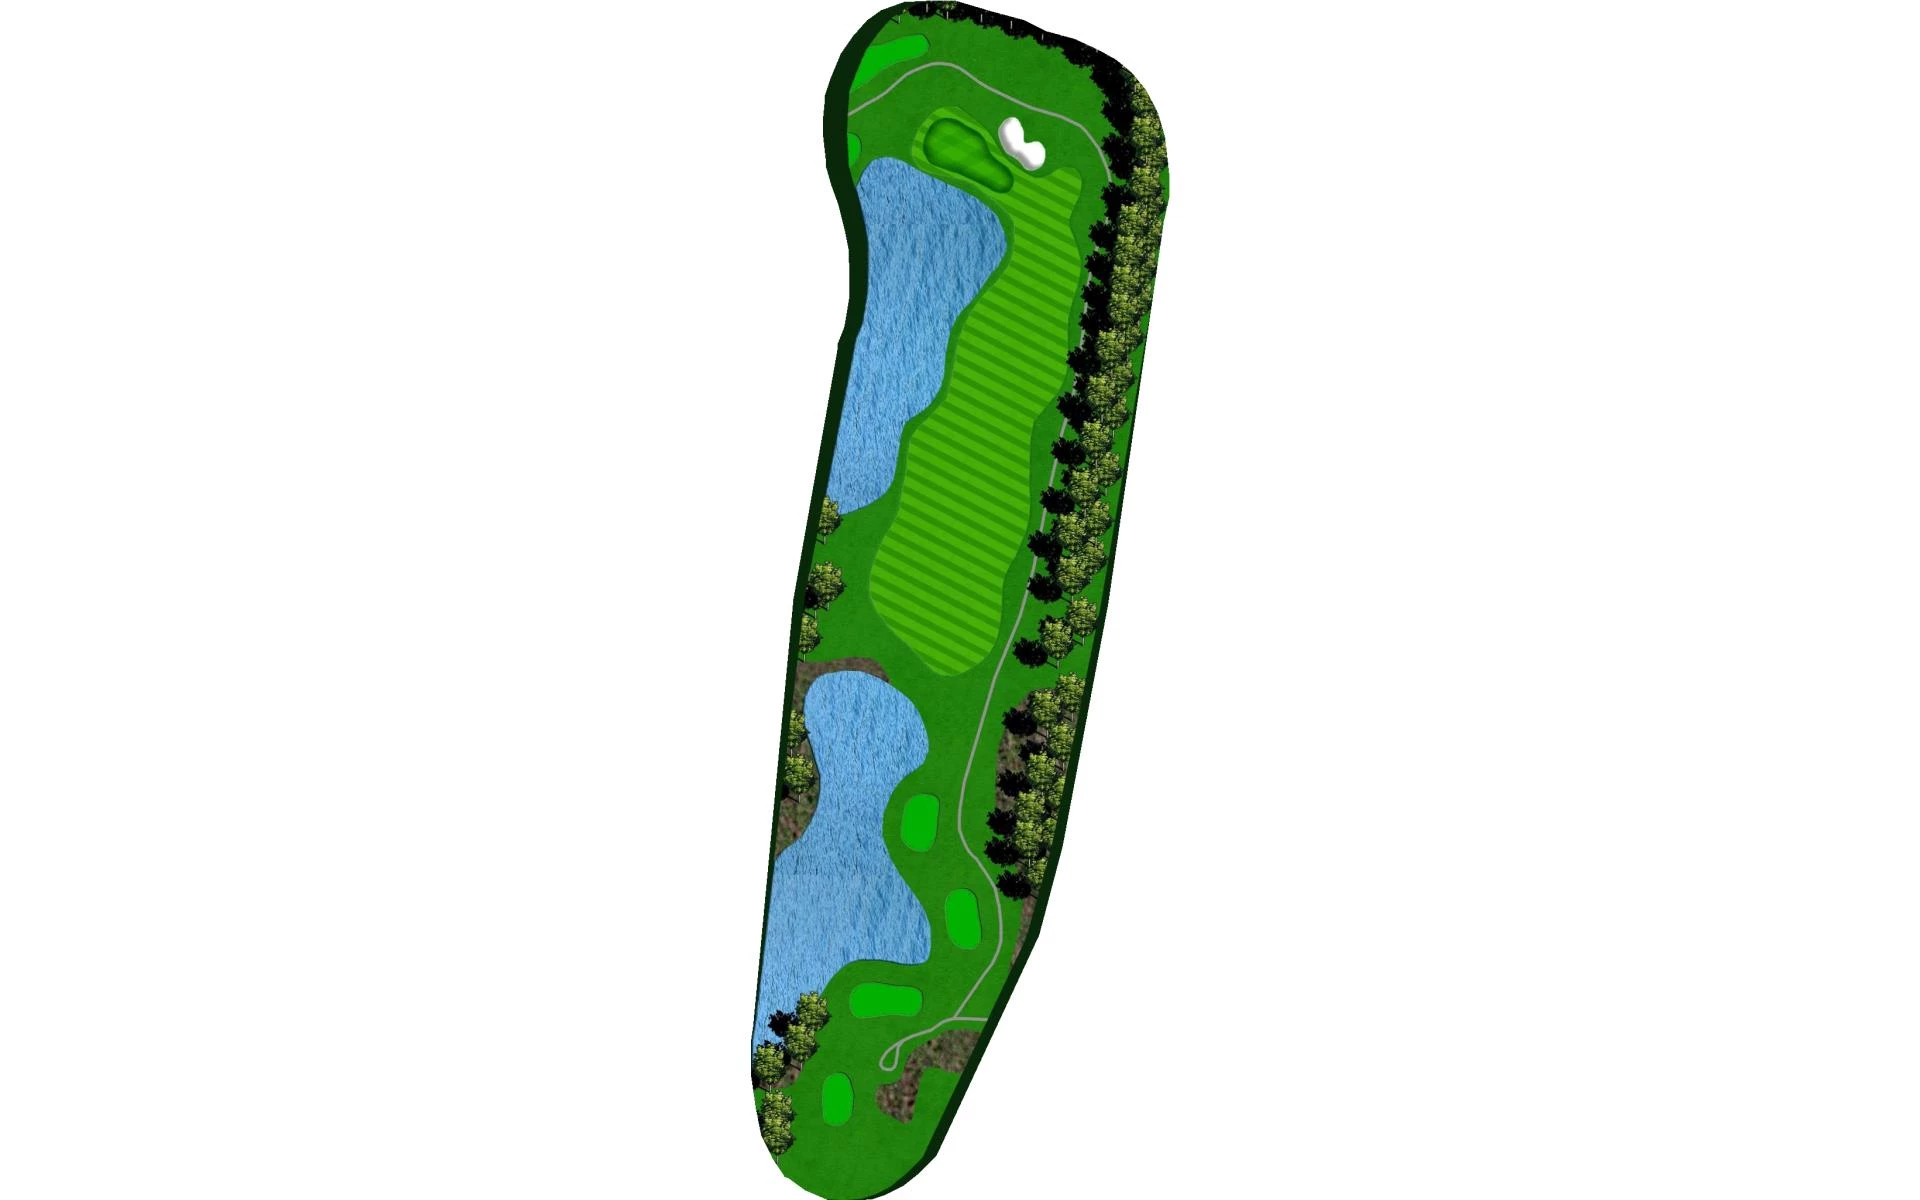
# 2 /
Par: 4
Handicaps:
Men's 6
Women's 8
Yardage by Tee:
GOLD 342
BLUE 295
WHITE 242
RED 242
Slope:
Gold-111 | Blue-107 | White-Men:102, Women:103 | Red-102
Pro Tips
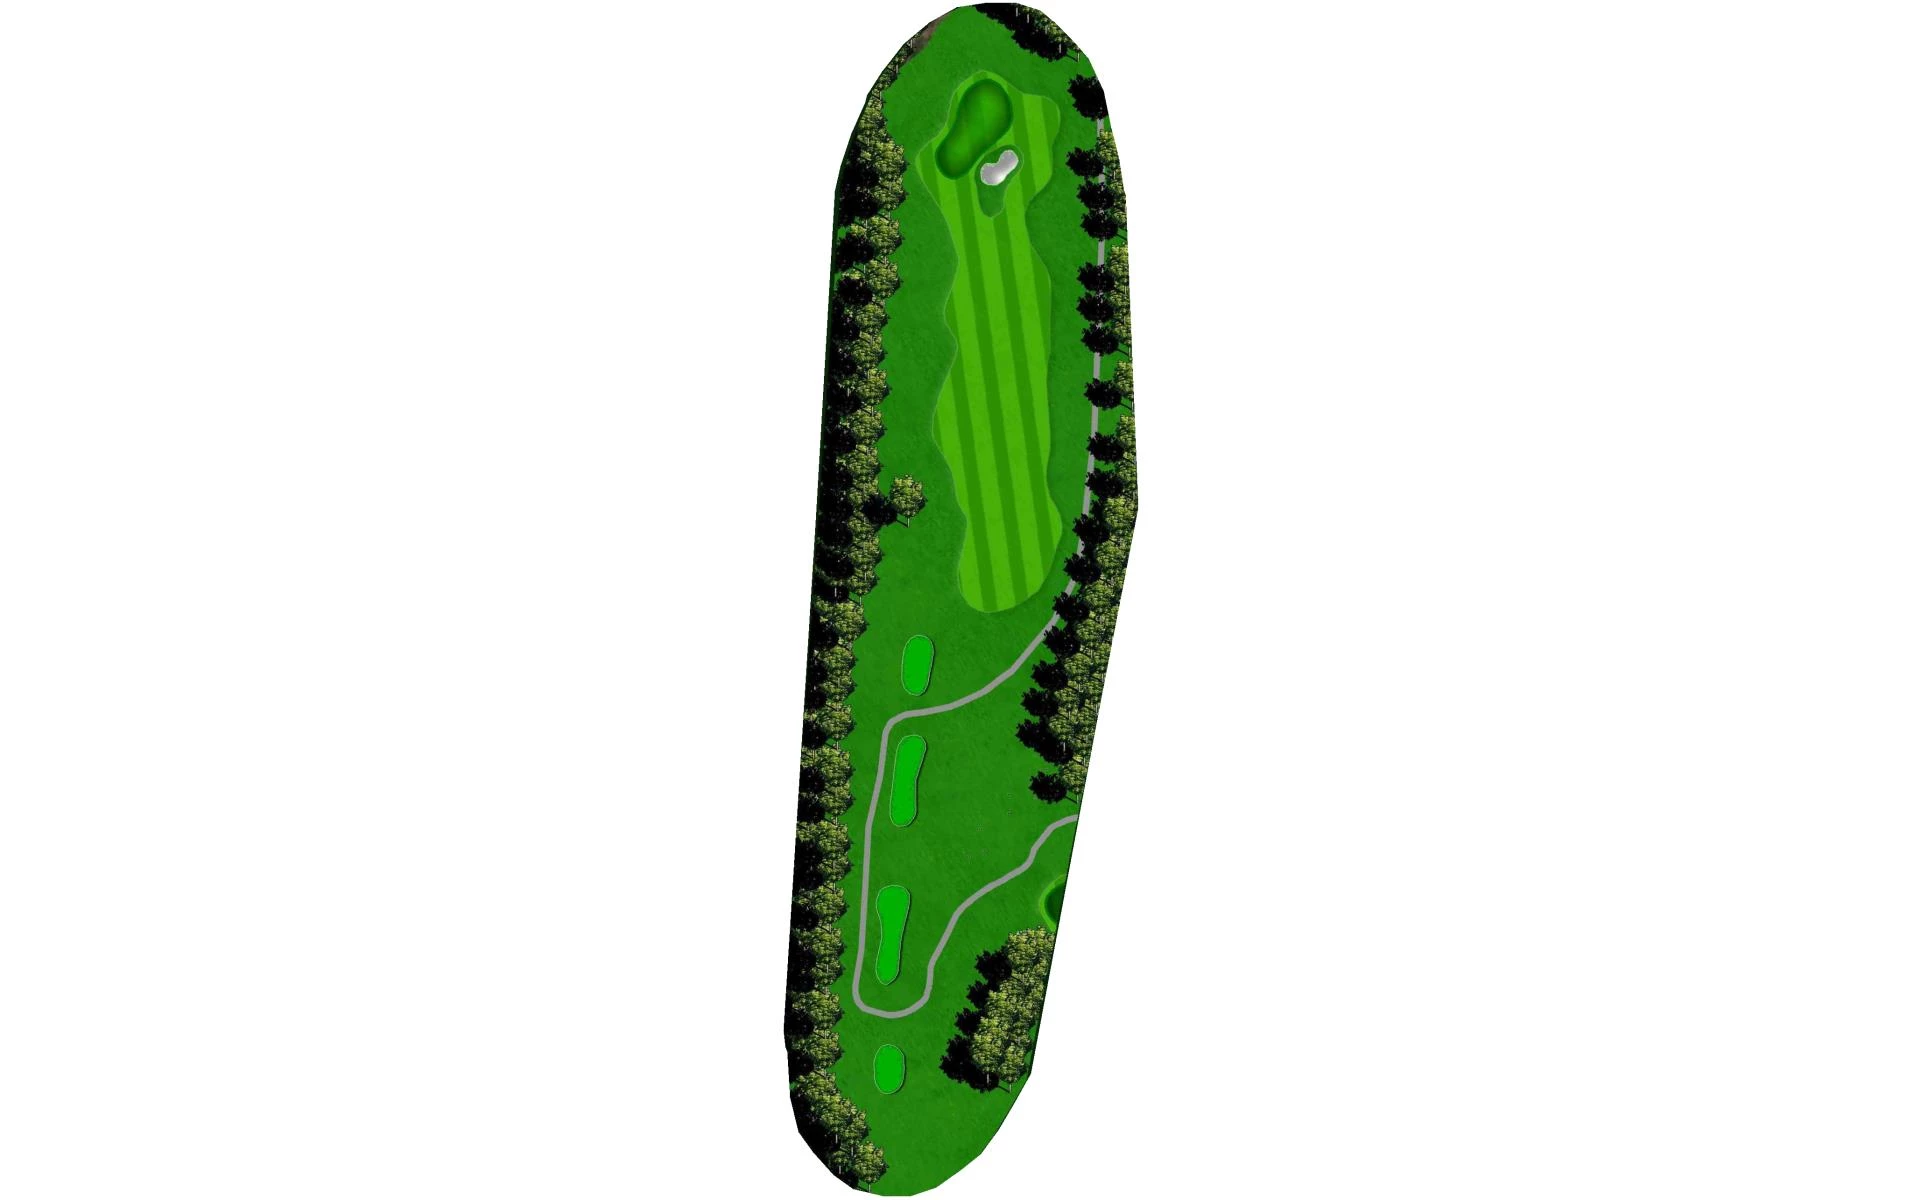
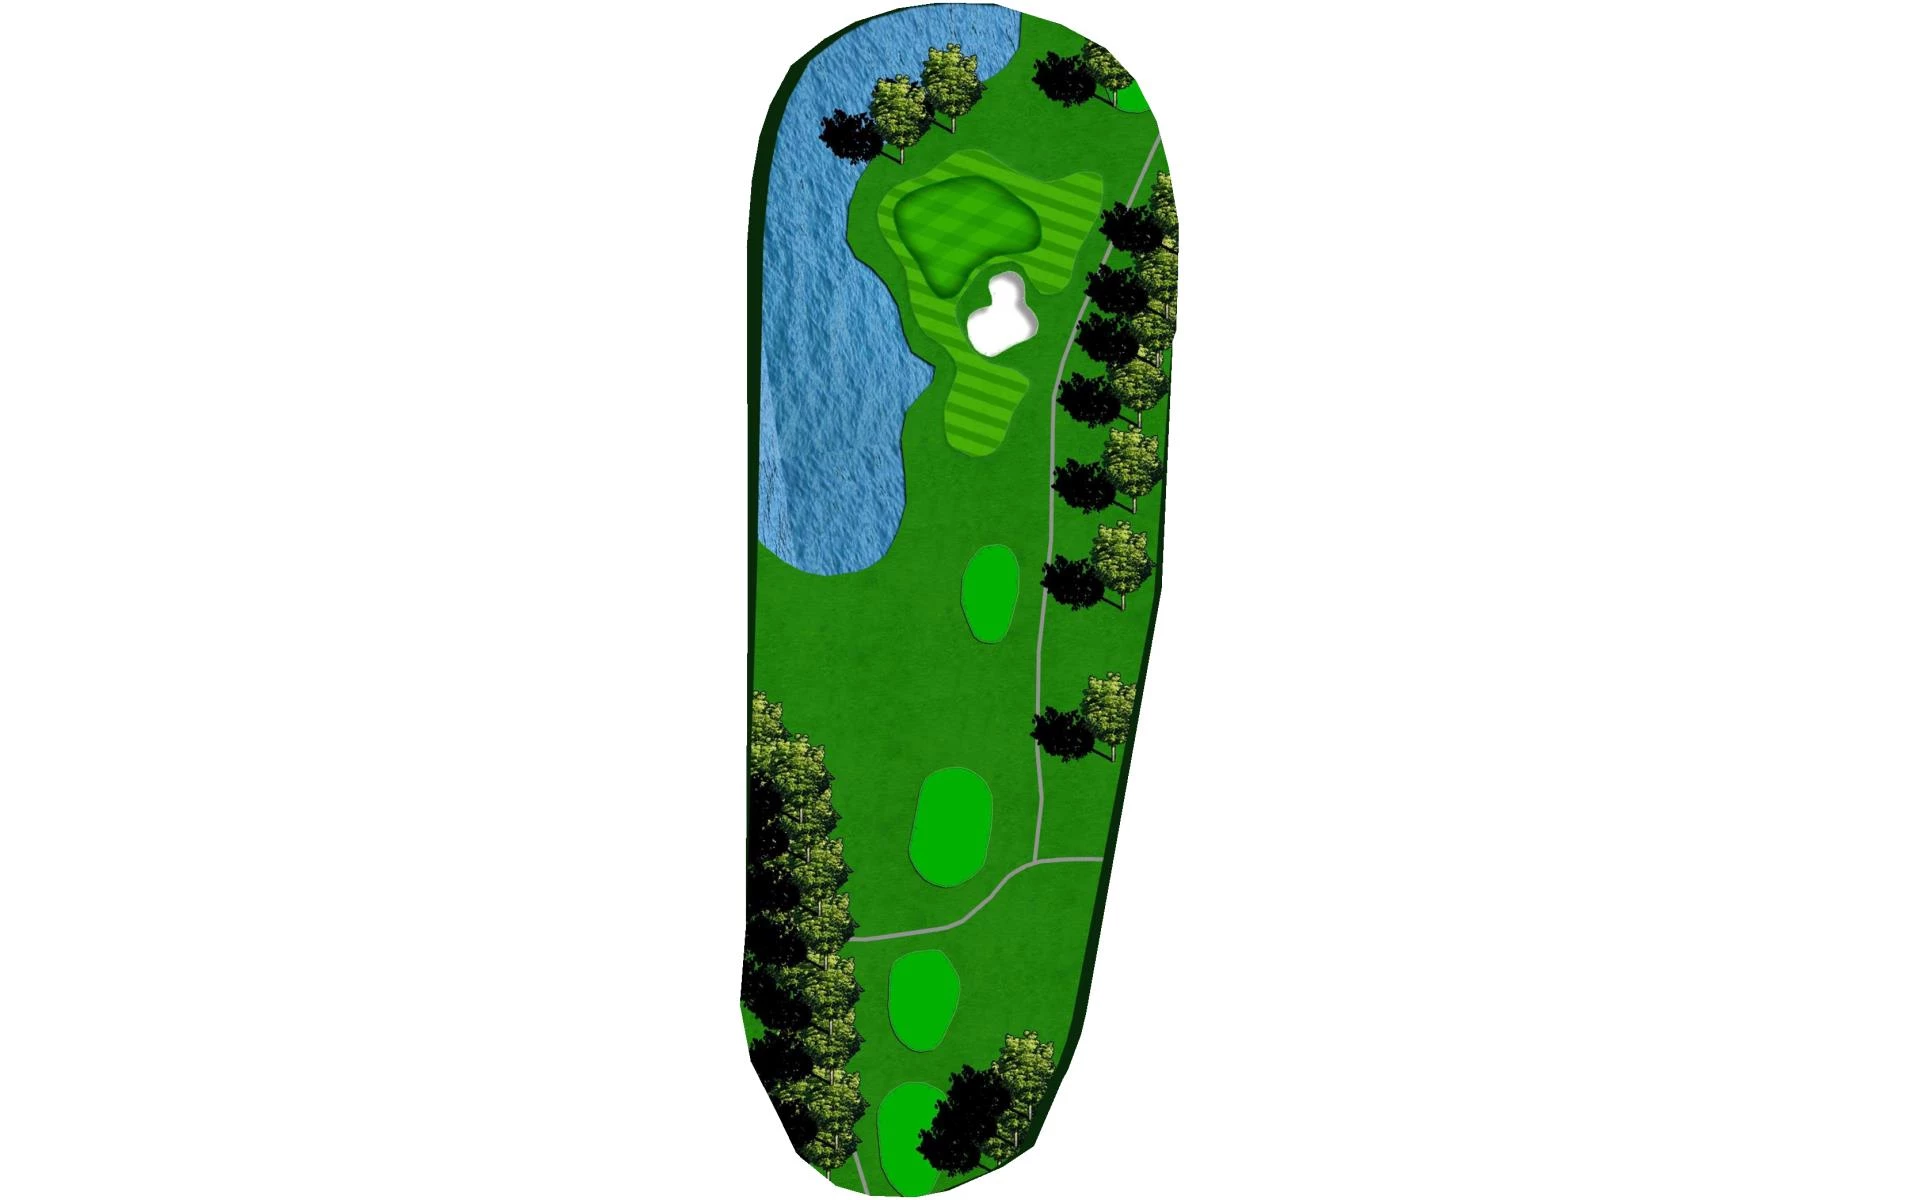
With out of bounds on the right and a penalty area on the left, accuracy is a must on this mid length par 4. The play here is to hit it down the right side of this bowl shaped fairway, and have the ball roll down to the middle. Leaving a short iron into the green.
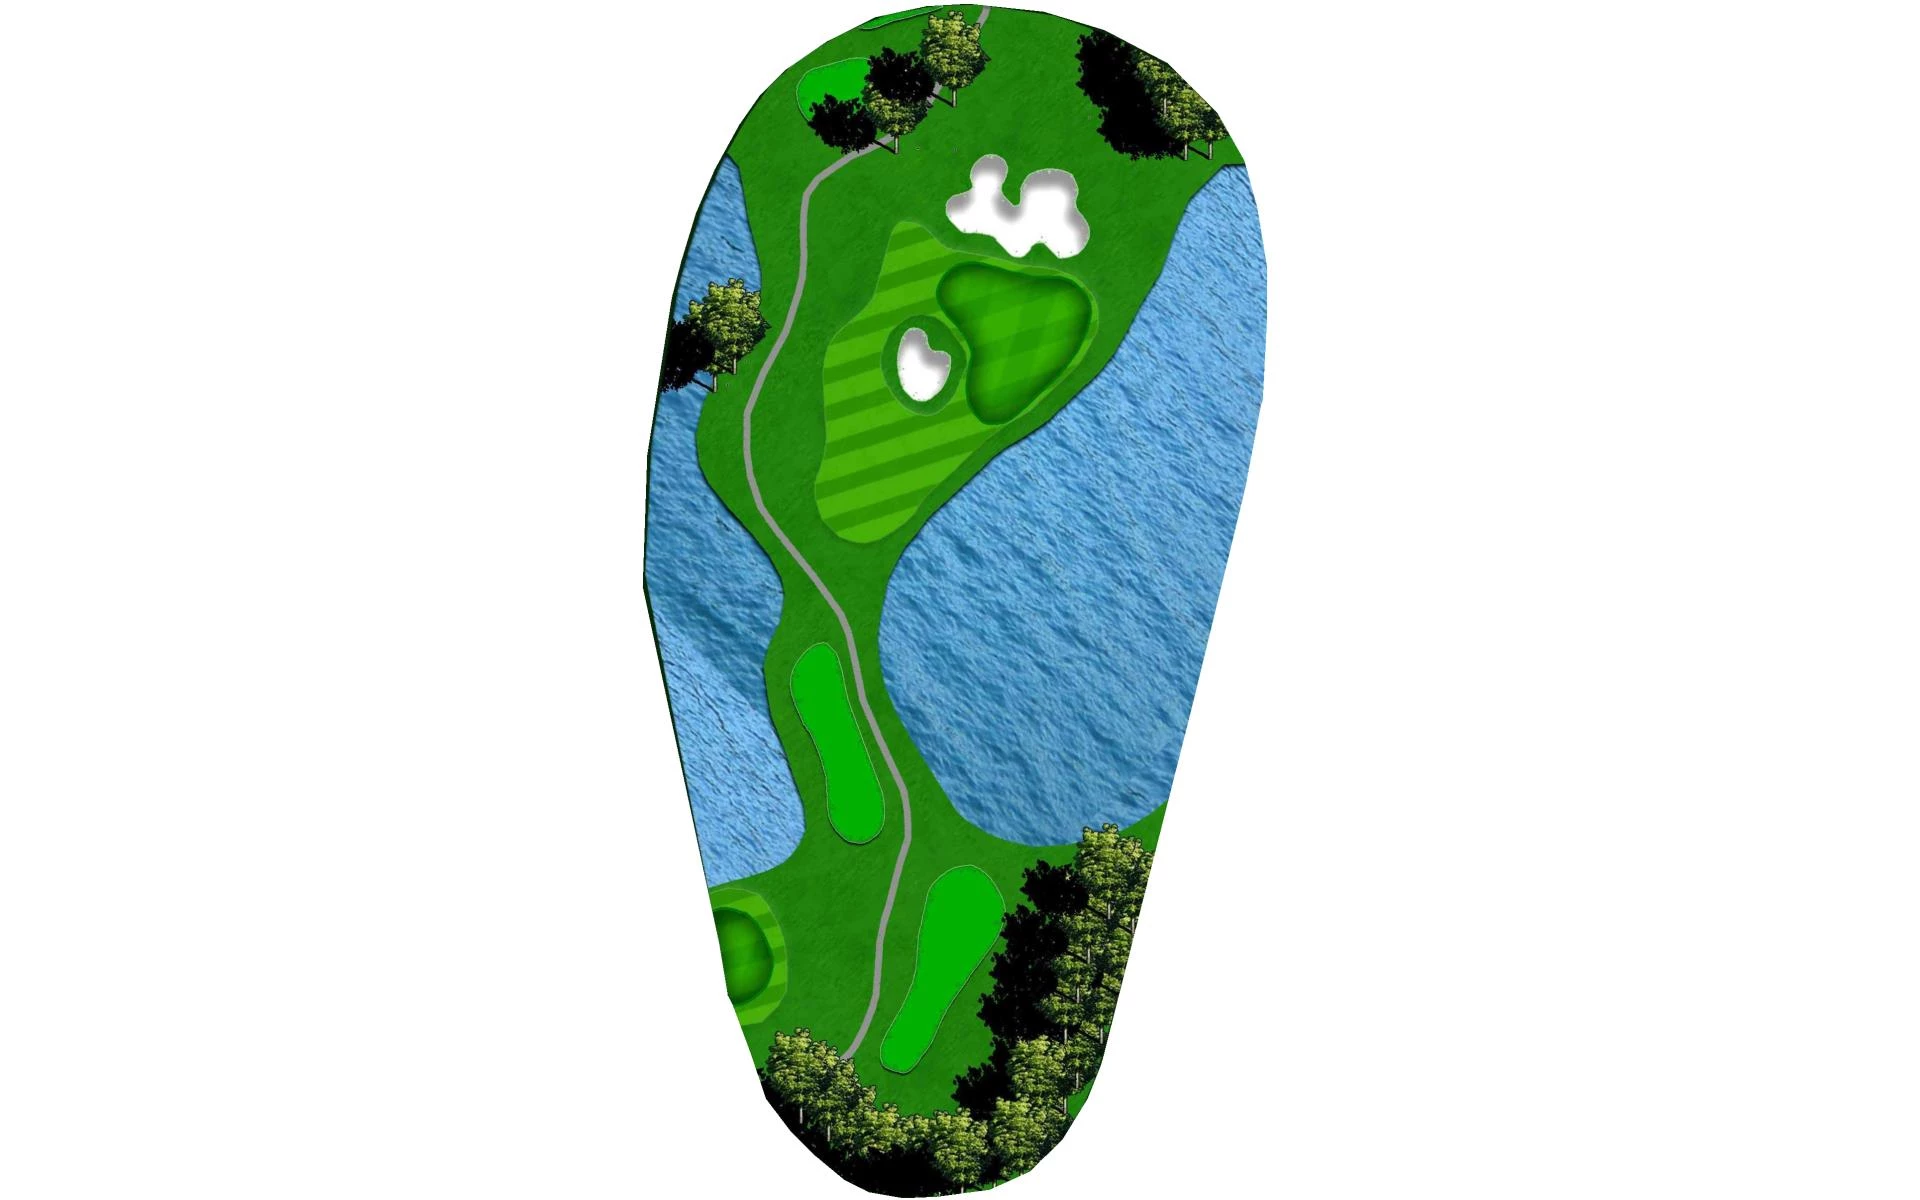
# 3 /
Par: 3
Handicaps:
Men's 14
Women's 10
Yardage by Tee:
GOLD 126
BLUE 118
WHITE 99
RED 99
Slope:
Gold-111 | Blue-107 | White-Men:102, Women:103 | Red-102
Pro Tips
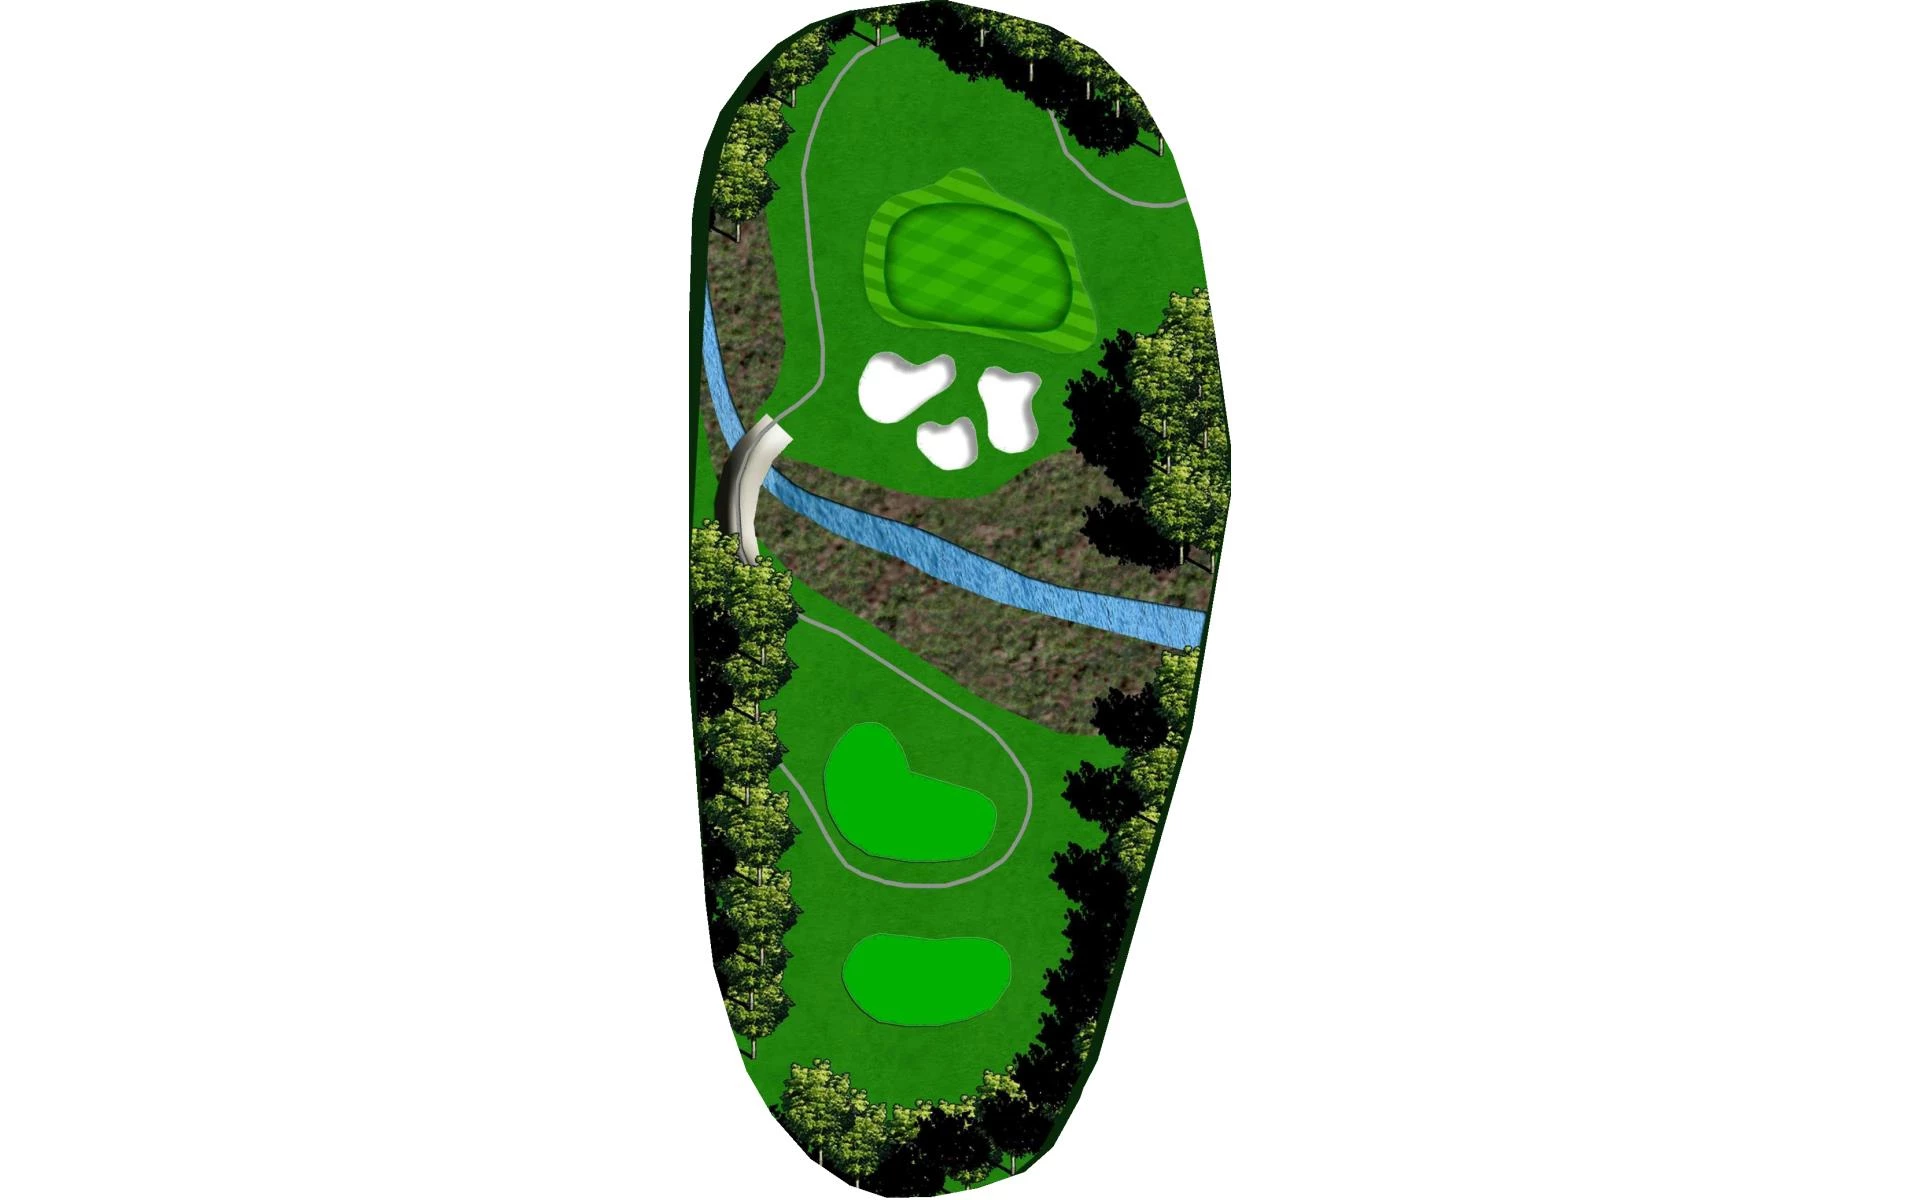
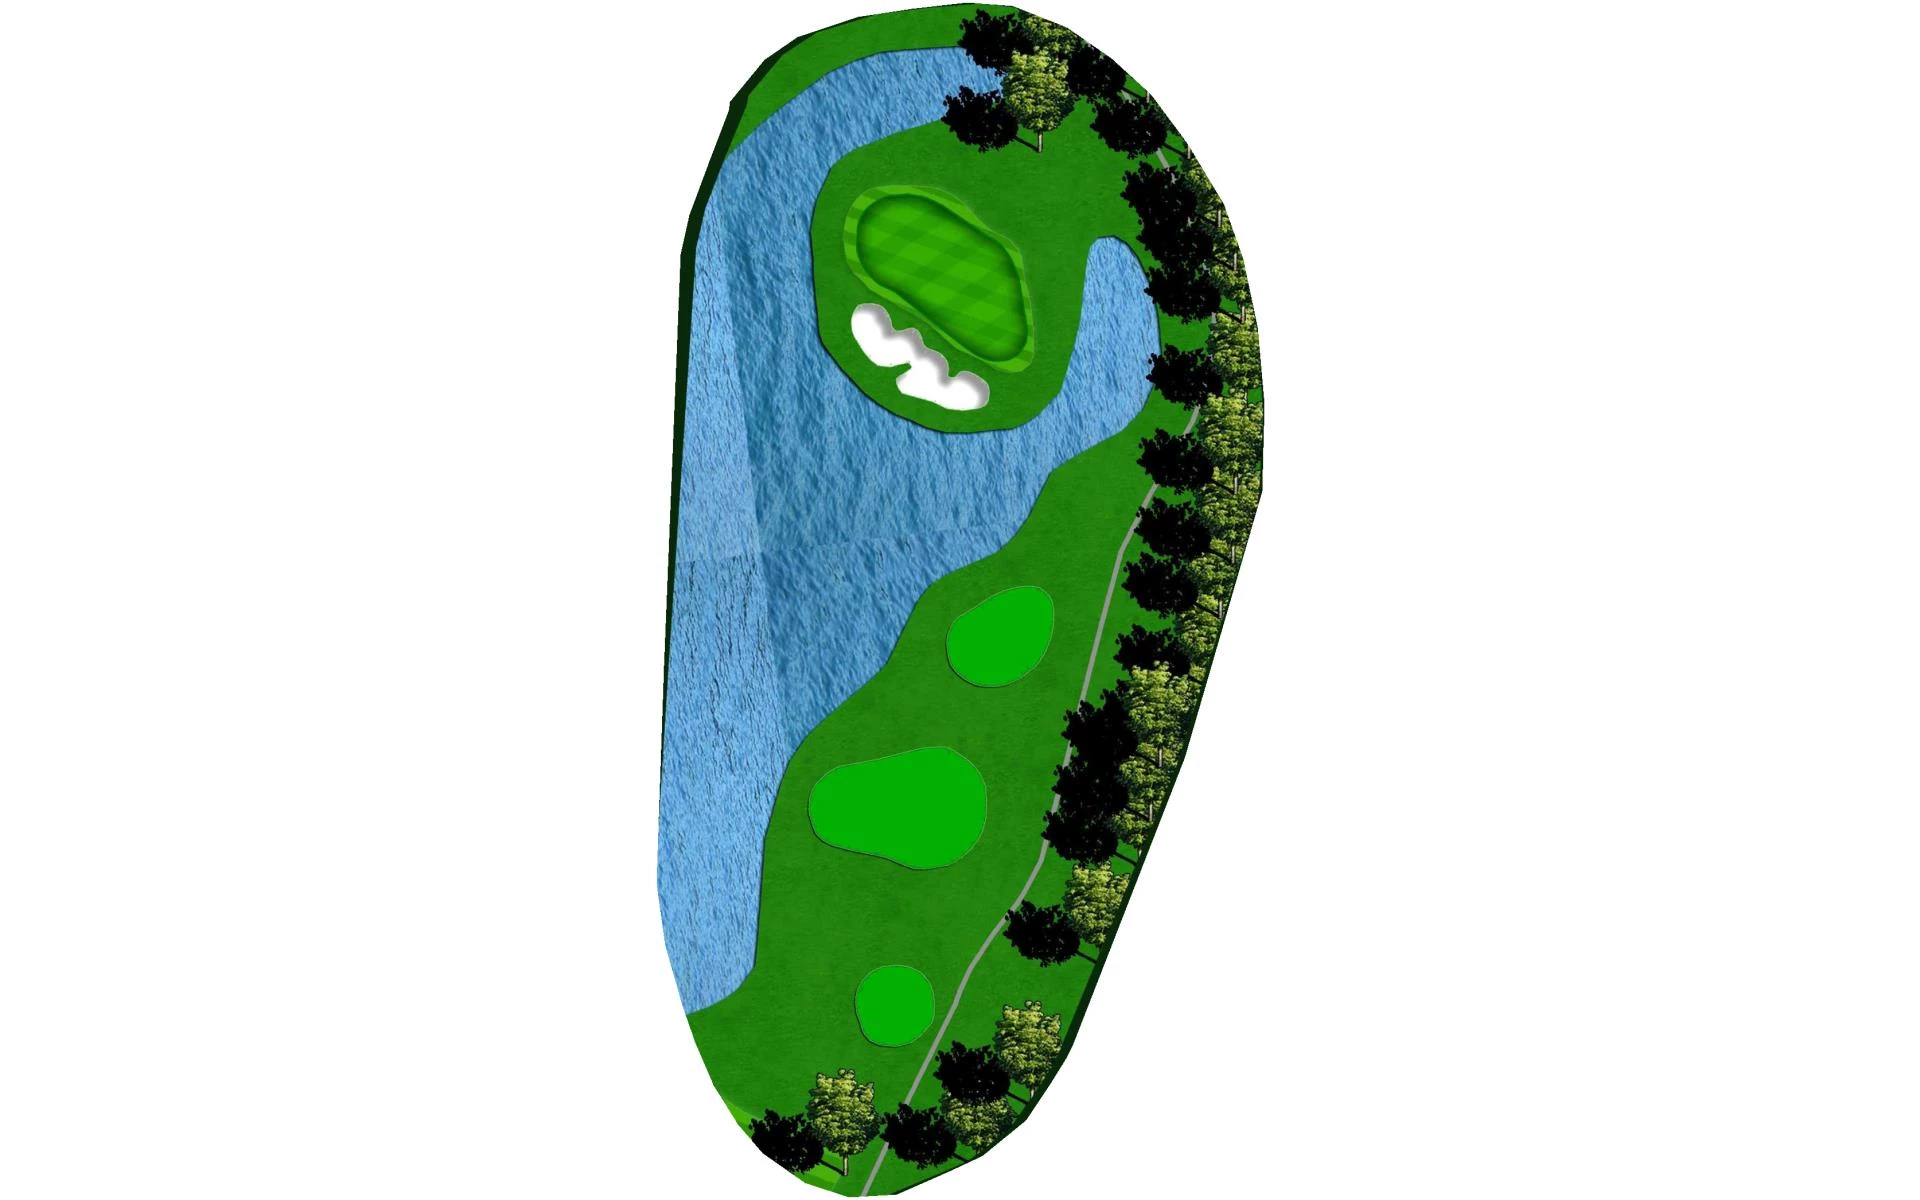
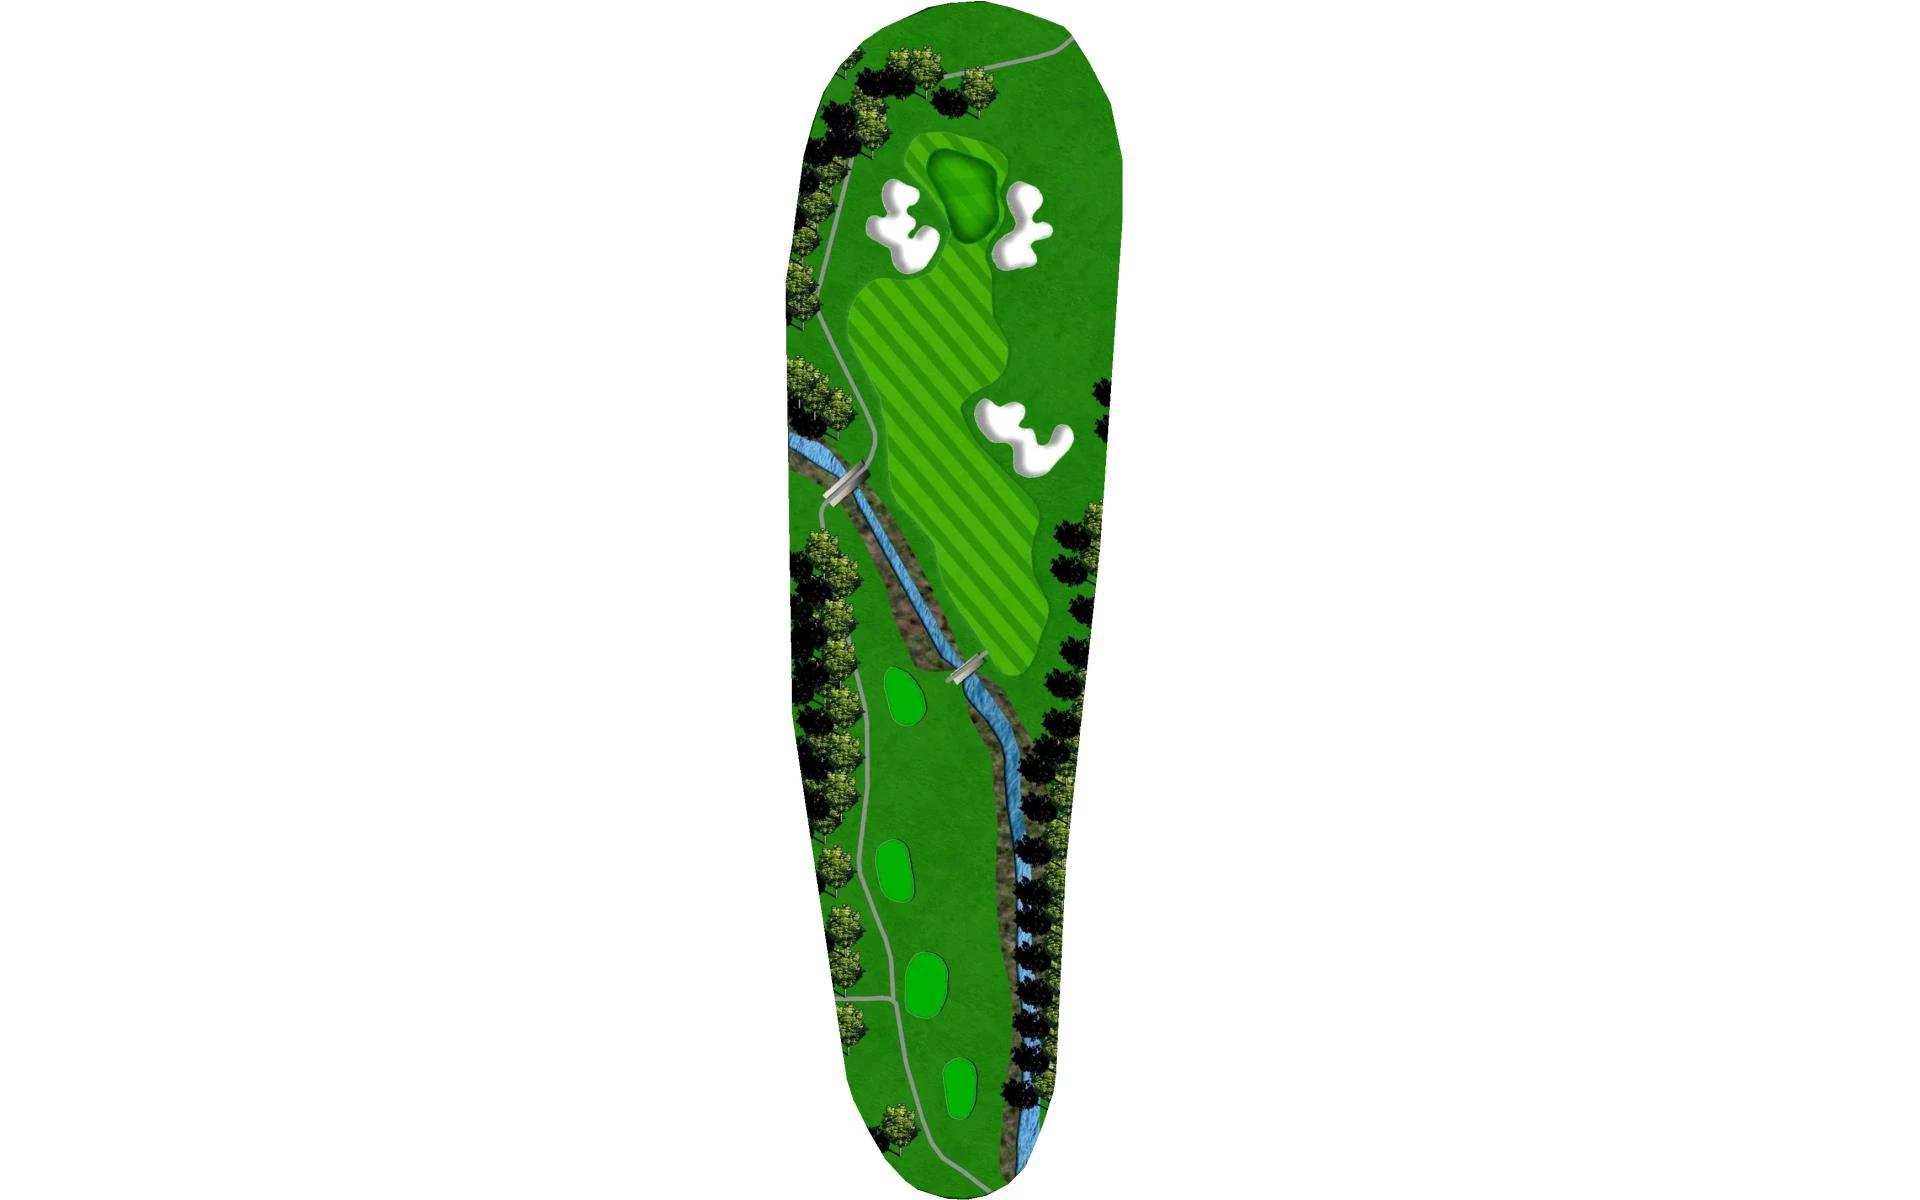
The third hole starts a three-hole stretch of par 3’s. This hole is a short to mid iron depending on the tee you play. You must navigate both the 60-yard ravine as well as the bunkers short of the green if you wish to have a chance for birdie.
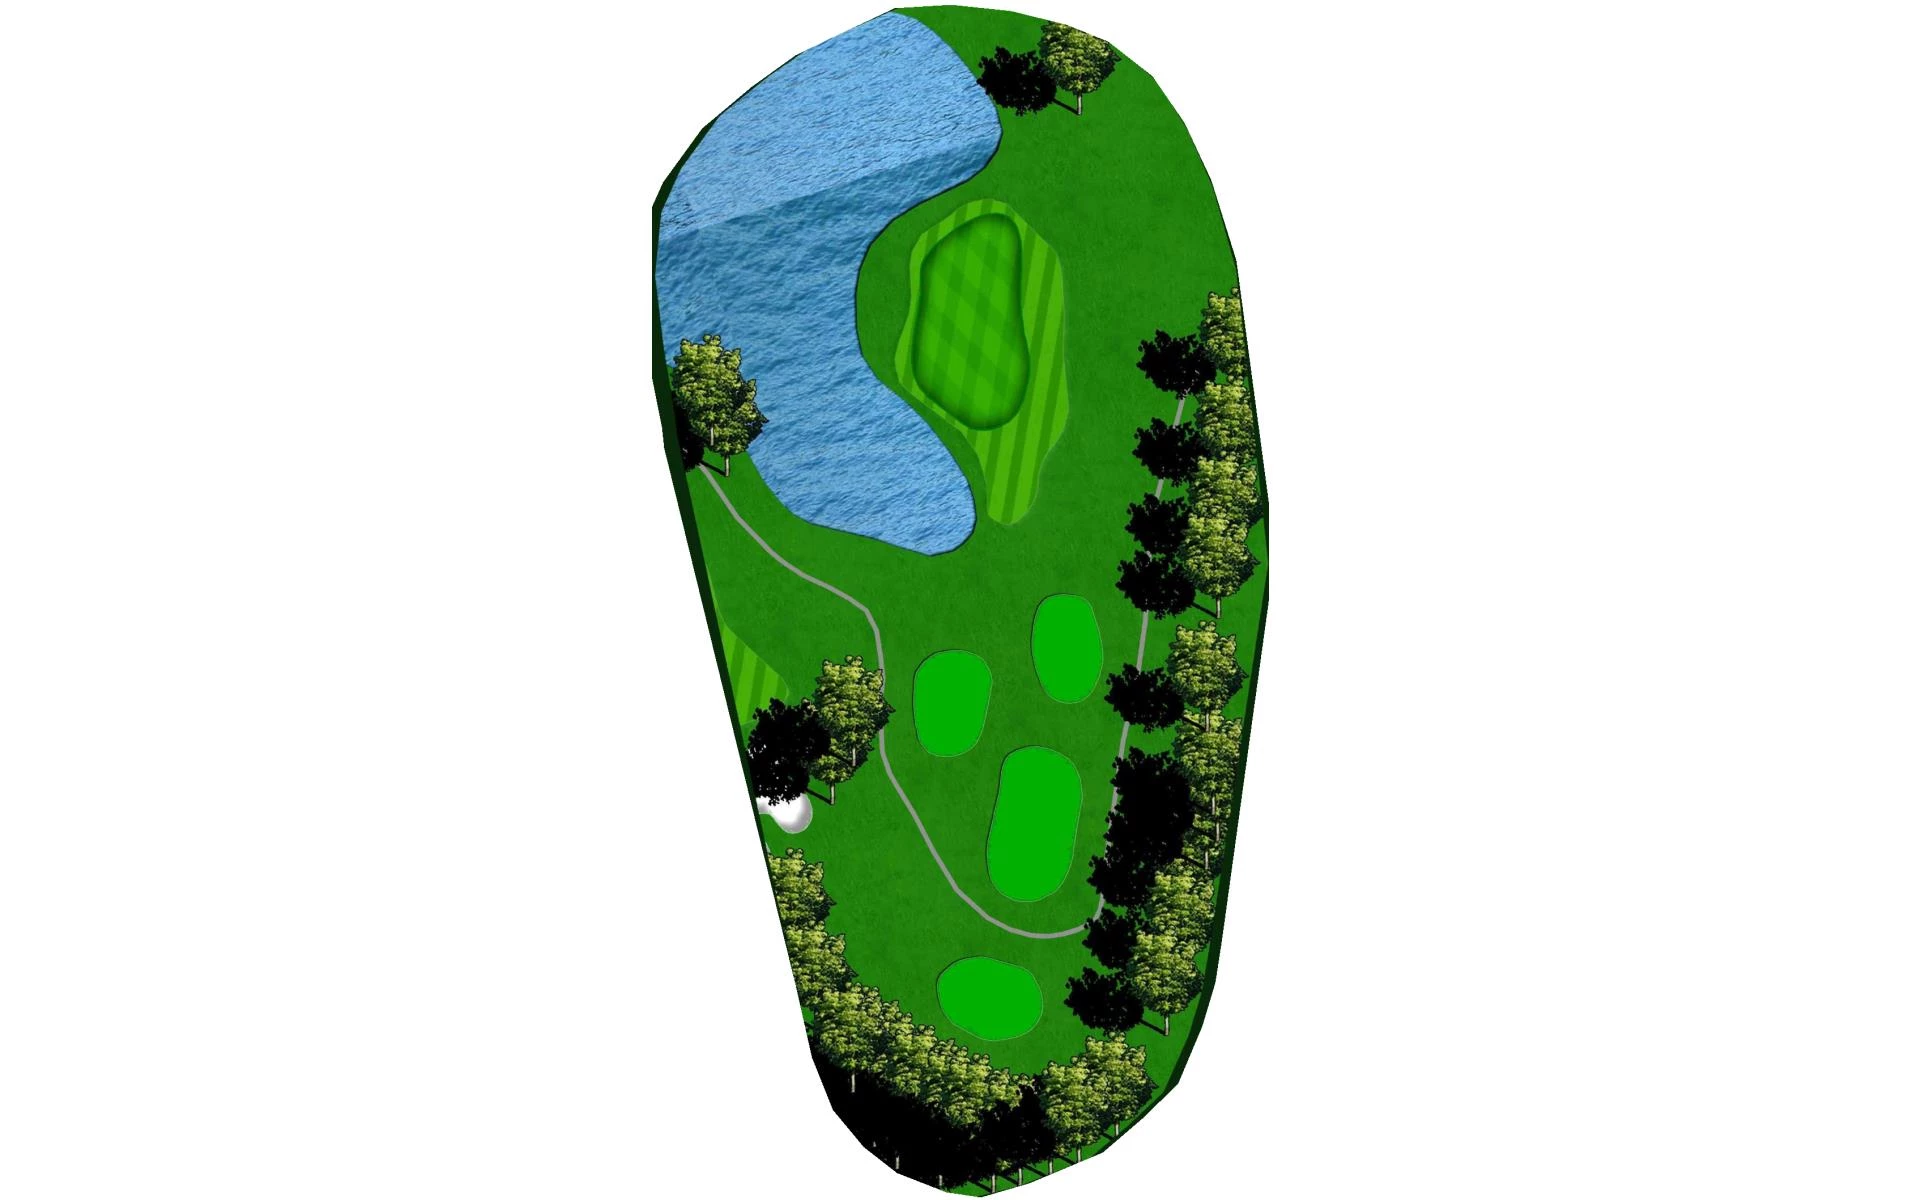
# 4 /
Par: 3
Handicaps:
Men's 16
Women's 14
Yardage by Tee:
GOLD 113
BLUE 94
WHITE 85
RED 85
Slope:
Gold-111 | Blue-107 | White-Men:102, Women:103 | Red-102
Pro Tips
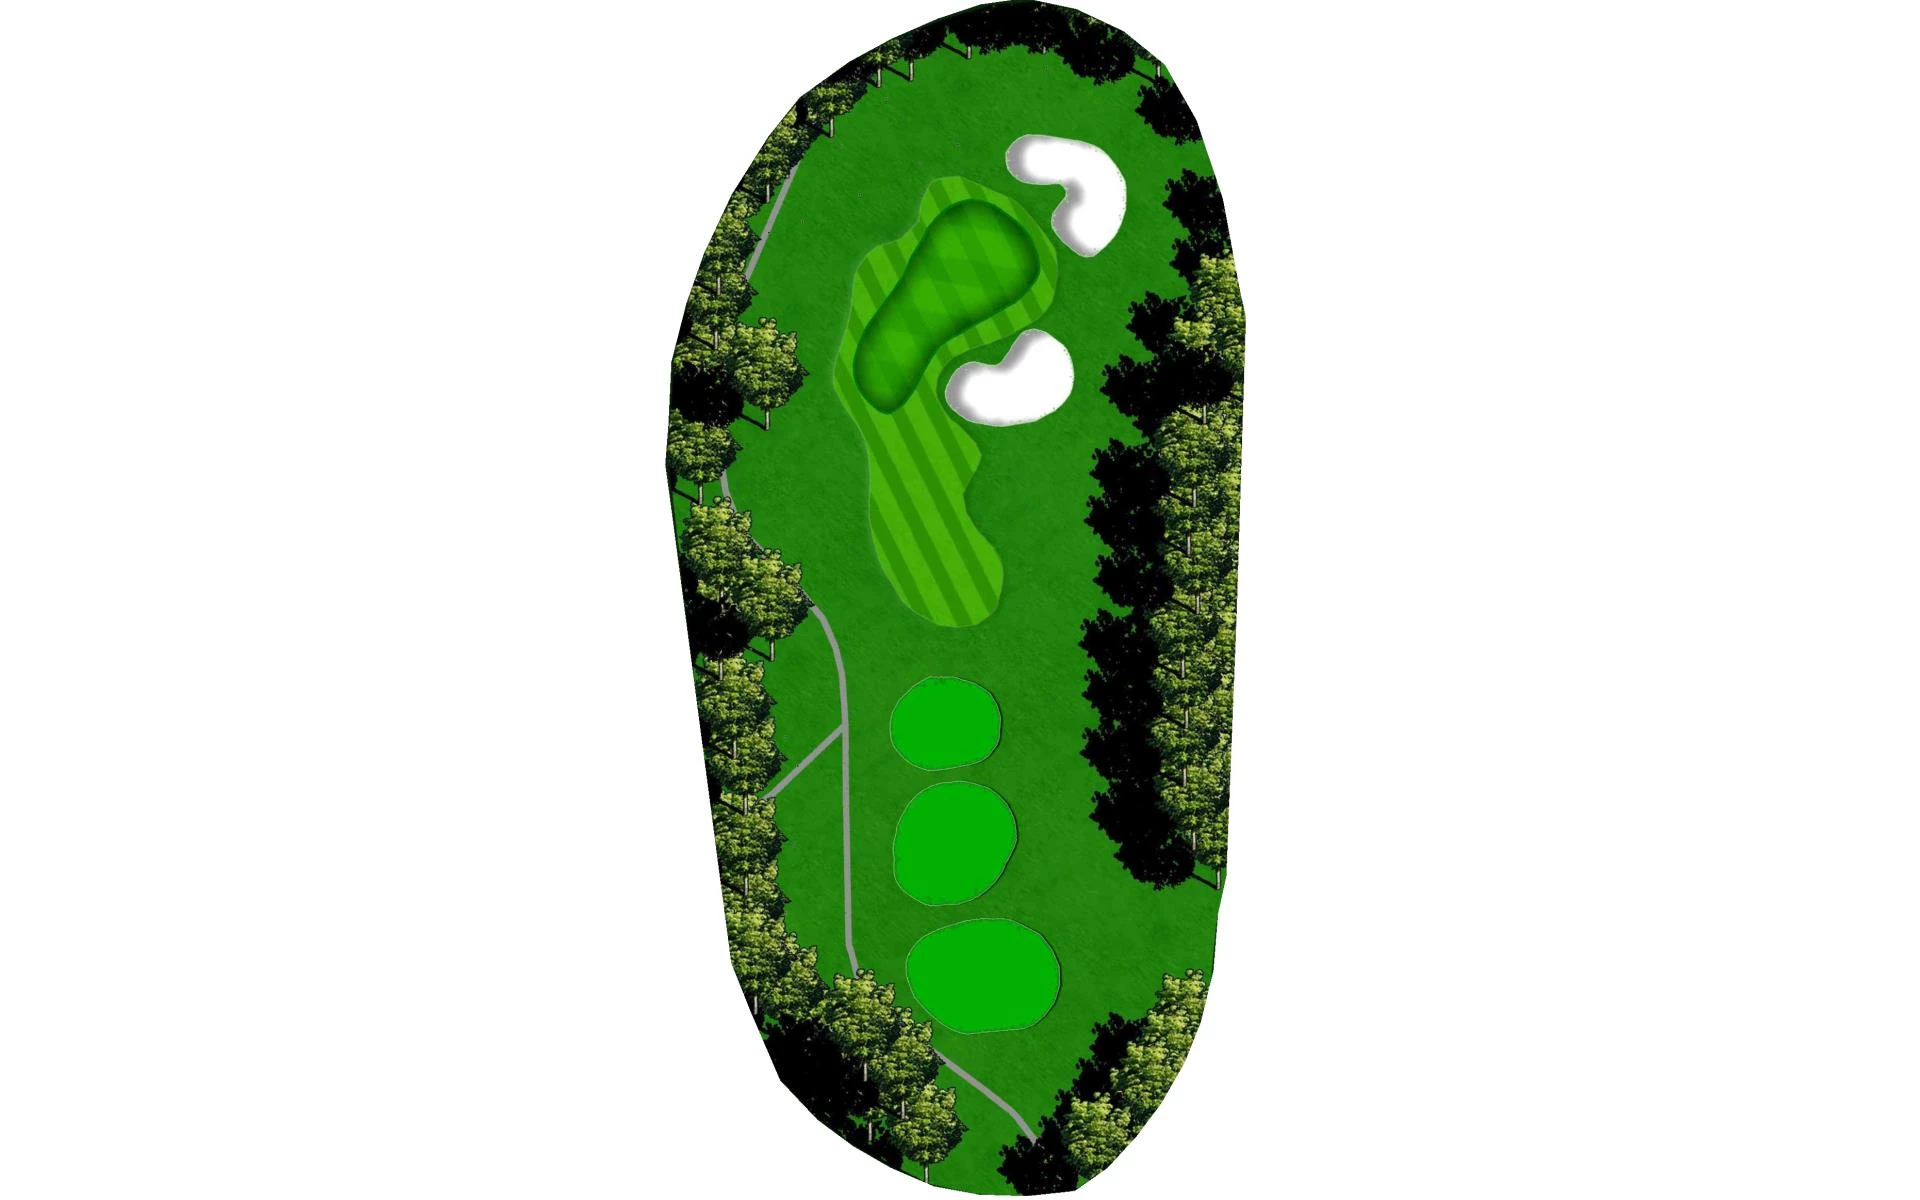
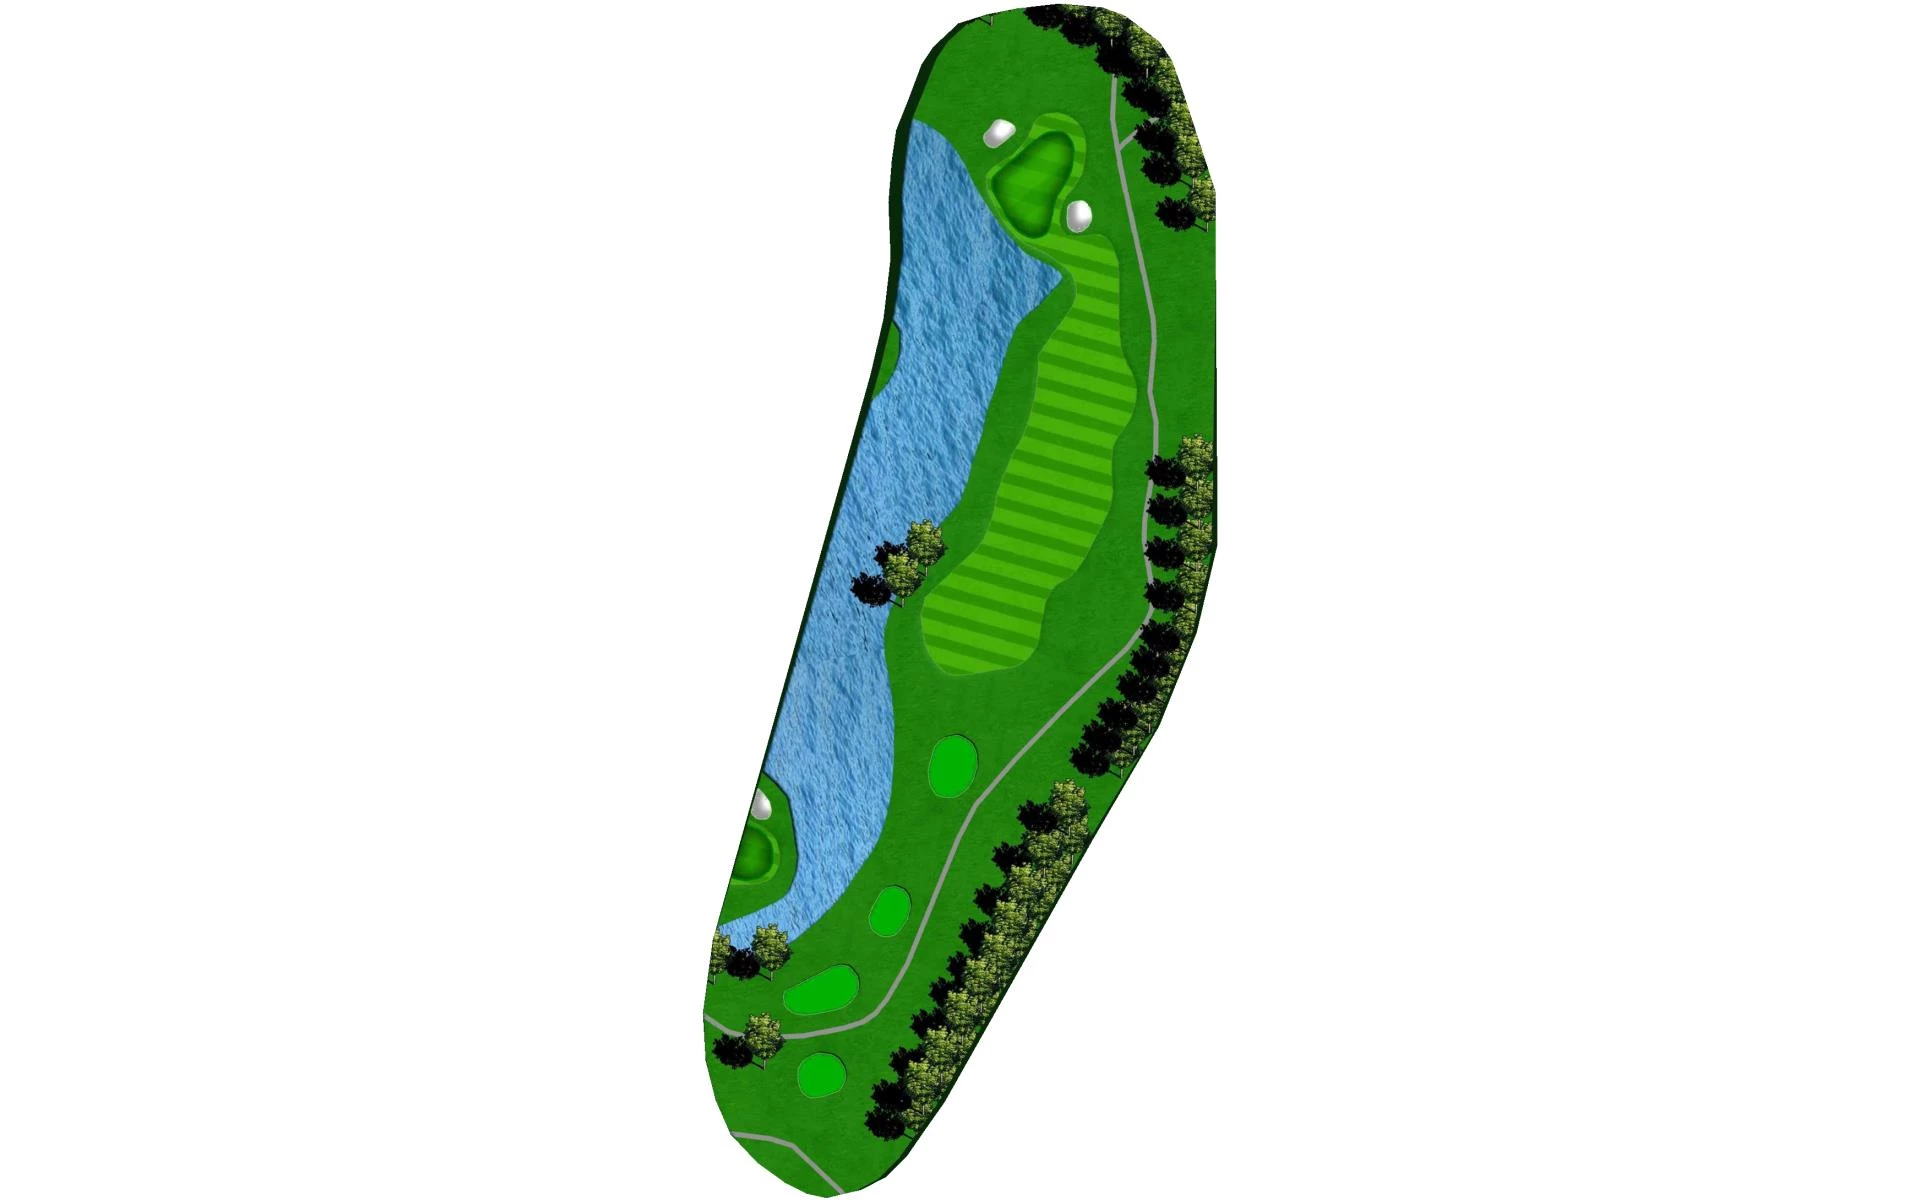
The fourth hole is a short par 3 that plays about a 1/2 club longer than the yardage. With trouble both short and long, accuracy is a premium. Aim for the front of the green if you wish to have a chance for a birdie.
# 5 /
Par: 3
Handicaps:
Men's 12
Women's 16
Yardage by Tee:
GOLD 162
BLUE 122
WHITE 96
RED 96
Slope:
Gold-111 | Blue-107 | White-Men:102, Women:103 | Red-102
Pro Tips
The fifth hole is one of the trickier par 3’s on the course. With it being about a 40 yard drop from tee to green your eyes will tell you to play one less club, but most of the time this hole plays true to yardage. With a bunker short and right of the green your best bet is to aim left off the tee.
# 6 /
Par: 4
Handicaps:
Men's 2
Women's 2
Yardage by Tee:
GOLD 374
BLUE 334
WHITE 300
RED 300
Slope:
Gold-111 | Blue-107 | White-Men:102, Women:103 | Red-102
Pro Tips
This well guarded par 4 with water left, and trees right, requires a tee shot that hits the fairway. The approach shot can give you a chance for birdie, but aim a little long to make sure you clear the water just short of the green.
# 7 /
Par: 3
Handicaps:
Men's 10
Women's 12
Yardage by Tee:
GOLD 131
BLUE 111
WHITE 88
RED 88
Slope:
Gold-111 | Blue-107 | White-Men:102, Women:103 | Red-102
Pro Tips
This short par 3 is surrounded by bunkers both short left and long, and water on the right. Aim for the middle of the green with the club of your choice and hope you hit it straight
# 8 /
Par: 3
Handicaps:
Men's 18
Women's 18
Yardage by Tee:
GOLD 116
BLUE 86
WHITE 65
RED 59
Slope:
Gold-111 | Blue-107 | White-Men:102, Women:103 | Red-102
Pro Tips
This short par 3 is the easiest hole on the front 9. All systems go! Go for the flag and see if you can make a birdie.
# 9 /
Par: 4
Handicaps:
Men's 4
Women's 4
Yardage by Tee:
GOLD 380
BLUE 350
WHITE 325
RED 290
Slope:
Gold-111 | Blue-107 | White-Men:102, Women:103 | Red-102
Pro Tips
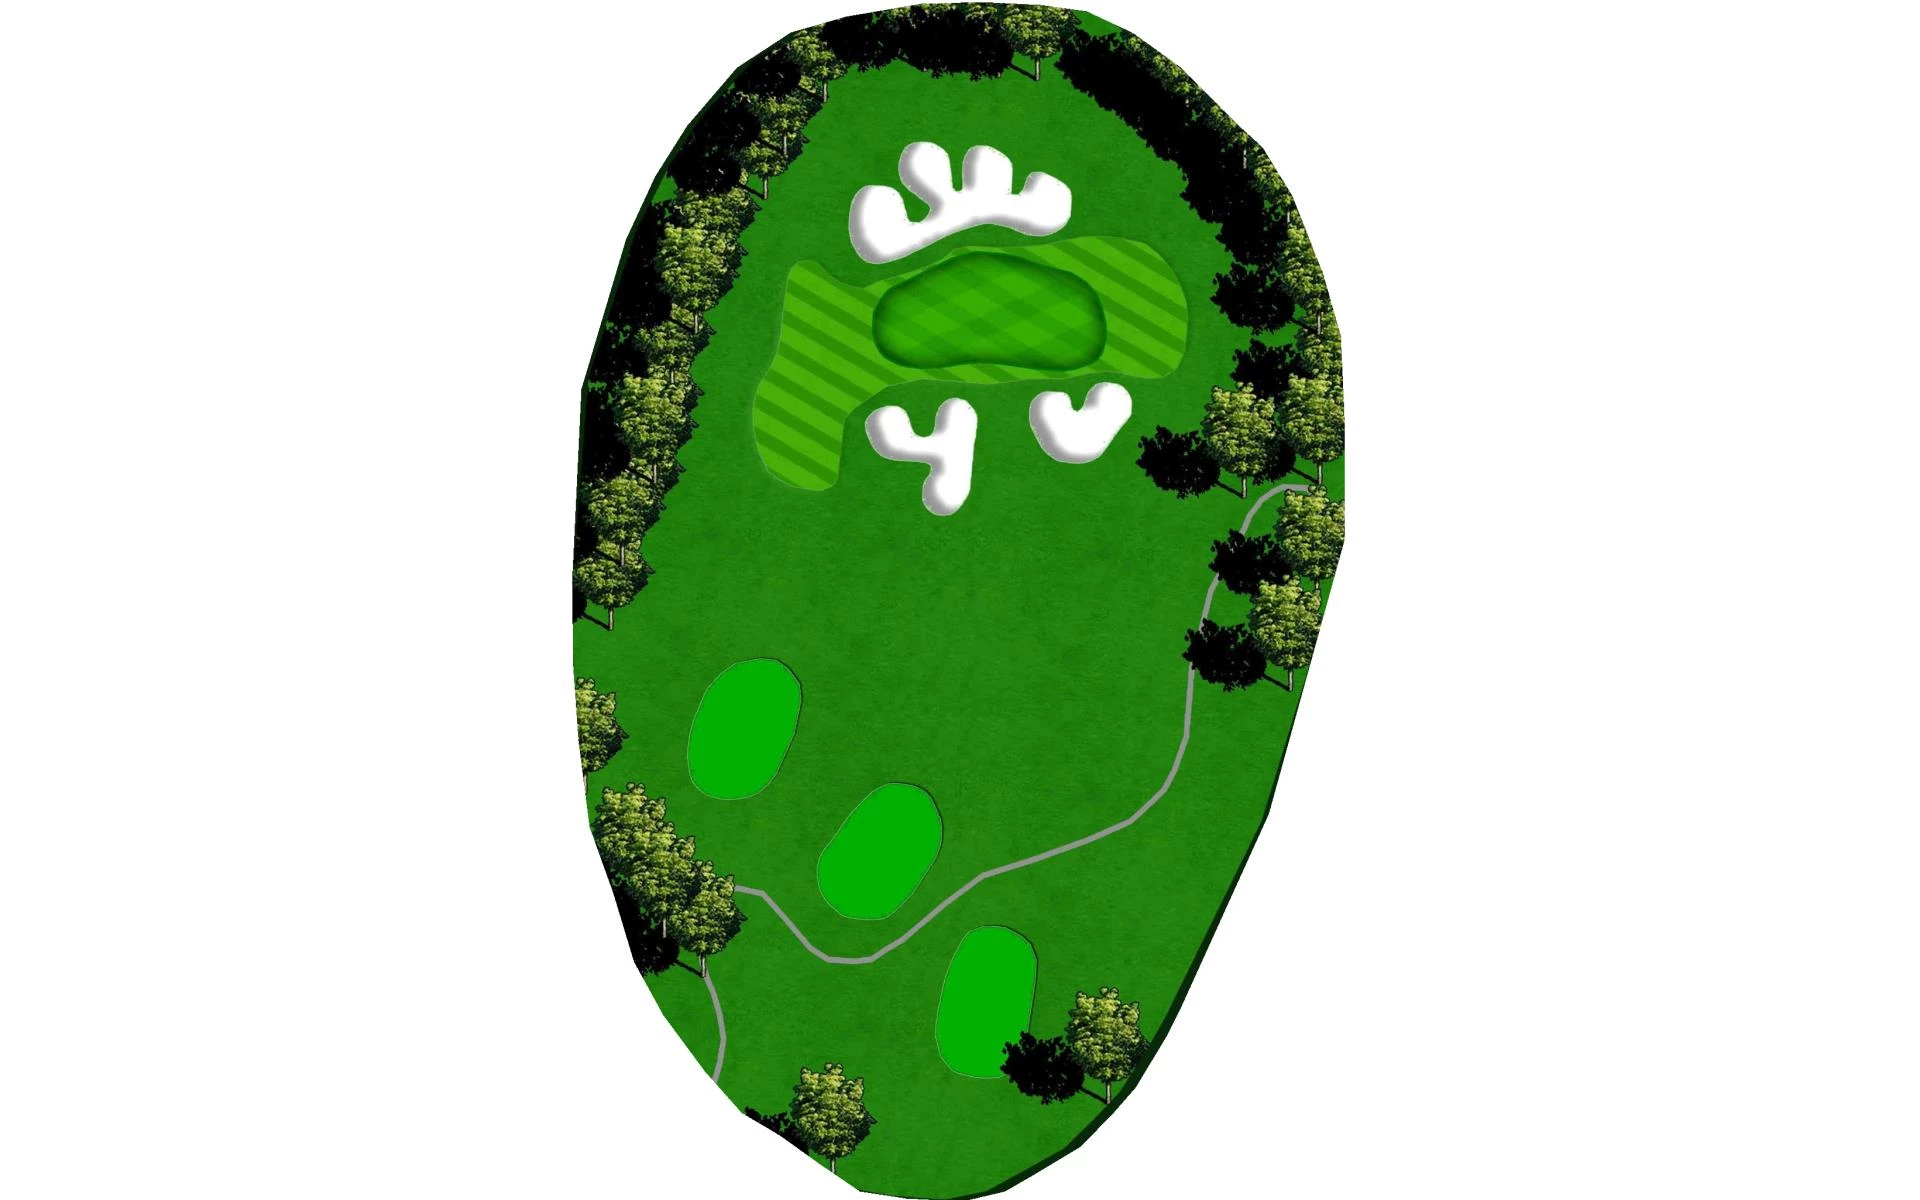
This par 4 has an intimidating up hill tee shot, with driver being recommended off the tee. With multiple grass bunkers short of the green, aim right and hit a little extra club for your second shot. Par is a great score on this hole.
# 10 /
Par: 3
Handicaps:
Men's 11
Women's 13
Yardage by Tee:
GOLD 159
BLUE 128
WHITE 117
RED 117
Slope:
Gold-111 | Blue-107 | White-Men:102, Women:103 | Red-102
Pro Tips
This hole starts a 3-hole stretch where water comes into play off the tee. The 10th hole is a mid-length par 3 that seems to always play into a cross wind. With 3 sides of the green covered by penalty areas accuracy is key.
# 11 /
Par: 3
Handicaps:
Men's 13
Women's 7
Yardage by Tee:
GOLD 129
BLUE 99
WHITE 90
RED 90
Slope:
Gold-111 | Blue-107 | White-Men:102, Women:103 | Red-102
Pro Tips
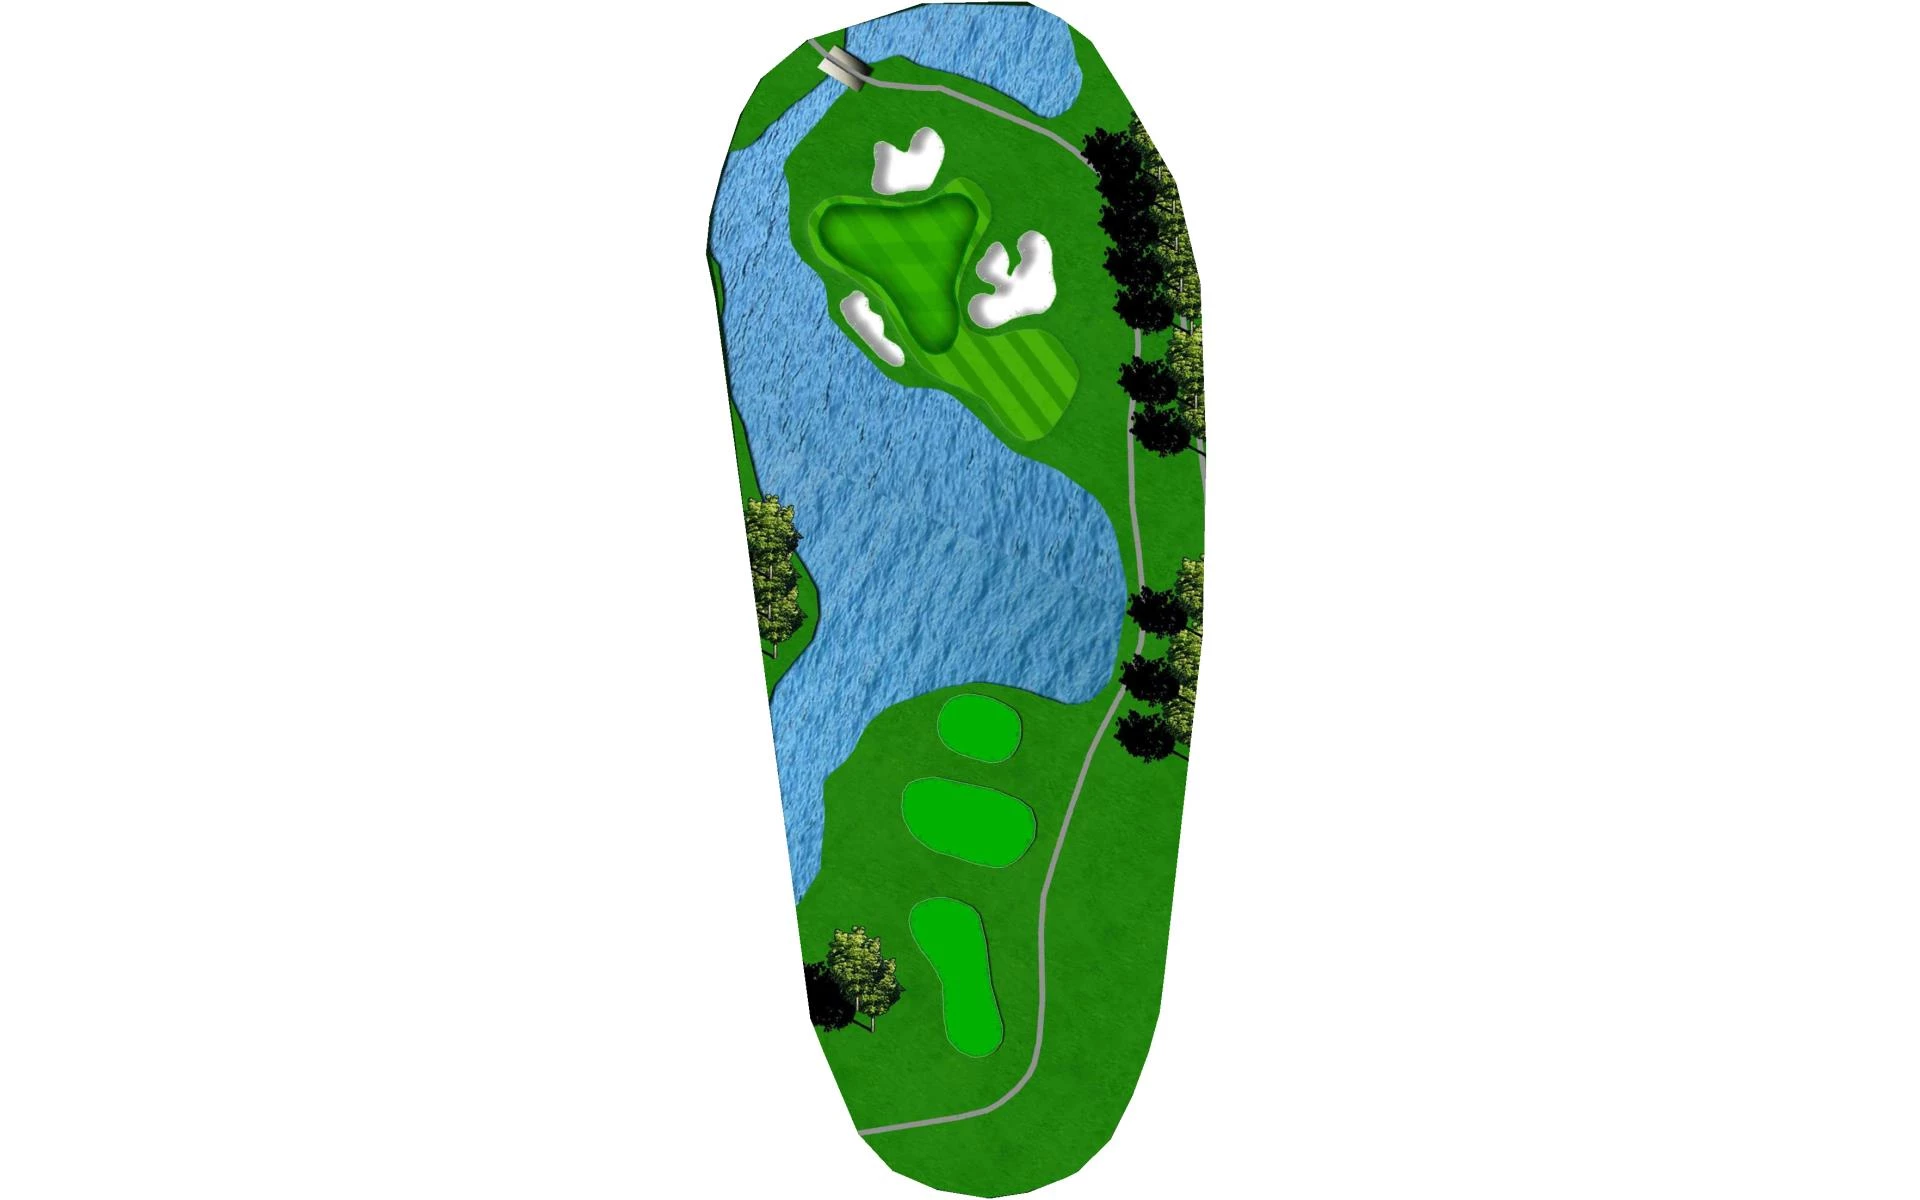
This hole has a peninsula green, with water on 3 sides as well as some of the hardest bunkers to get out of short. With wind always tricky on this hole take a little extra club and aim a touch long.
# 12 /
Par: 4
Handicaps:
Men's 3
Women's 1
Yardage by Tee:
GOLD 305
BLUE 281
WHITE 247
RED 247
Slope:
Gold-111 | Blue-107 | White-Men:102, Women:103 | Red-102
Pro Tips
The 12th hole is a short par 4 with accuracy being more important than length. It is recommended to aim right off the tee and hit to a yardage you’re comfortable with for your second shot. A good second shot and you can be rewarded with a birdie.
# 13 /
Par: 3
Handicaps:
Men's 15
Women's 17
Yardage by Tee:
GOLD 116
BLUE 104
WHITE 89
RED 89
Slope:
Gold-111 | Blue-107 | White-Men:102, Women:103 | Red-102
Pro Tips
A short par 3 where the green slopes away from you off the tee. A high tee shot is ideal if you want to guarantee your ball to stay on the green. Trouble short and long.
# 14 /
Par: 4
Handicaps:
Men's 1
Women's 5
Yardage by Tee:
GOLD 369
BLUE 339
WHITE 253
RED 253
Slope:
Gold-111 | Blue-107 | White-Men:102, Women:103 | Red-102
Pro Tips
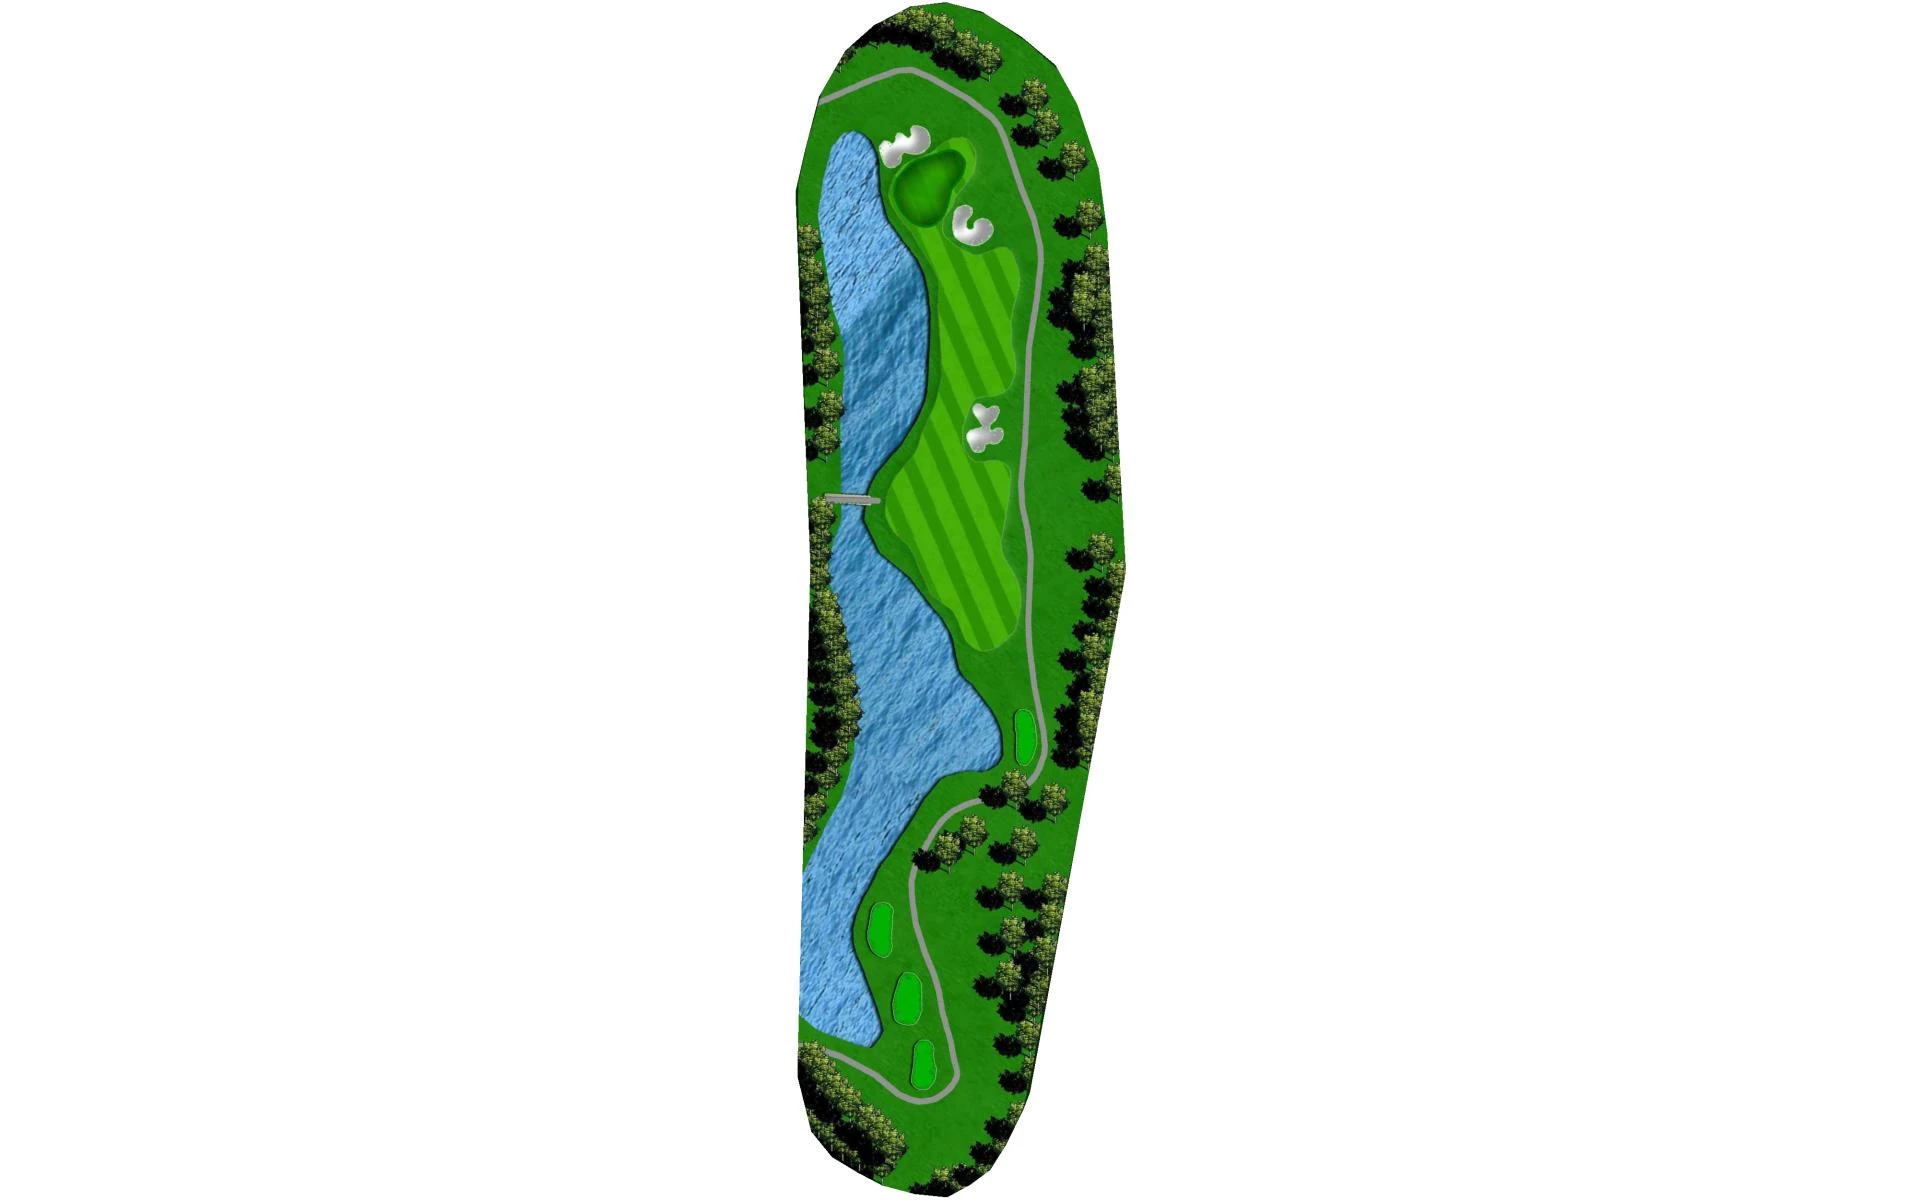
With a forced carry off the tee and water down the entire left side, this is the hardest hole on the course. Aim your tee shot just short of the bunker to leave yourself a 125 to 175 yard shot to the green. With a huge slope in the middle of the green, your approach shot should land near the front of the green if you wish to have a putt for birdie.
# 15 /
Par: 4
Handicaps:
Men's 9
Women's 11
Yardage by Tee:
GOLD 333
BLUE 302
WHITE 269
RED 269
Slope:
Gold-111 | Blue-107 | White-Men:102, Women:103 | Red-102
Pro Tips
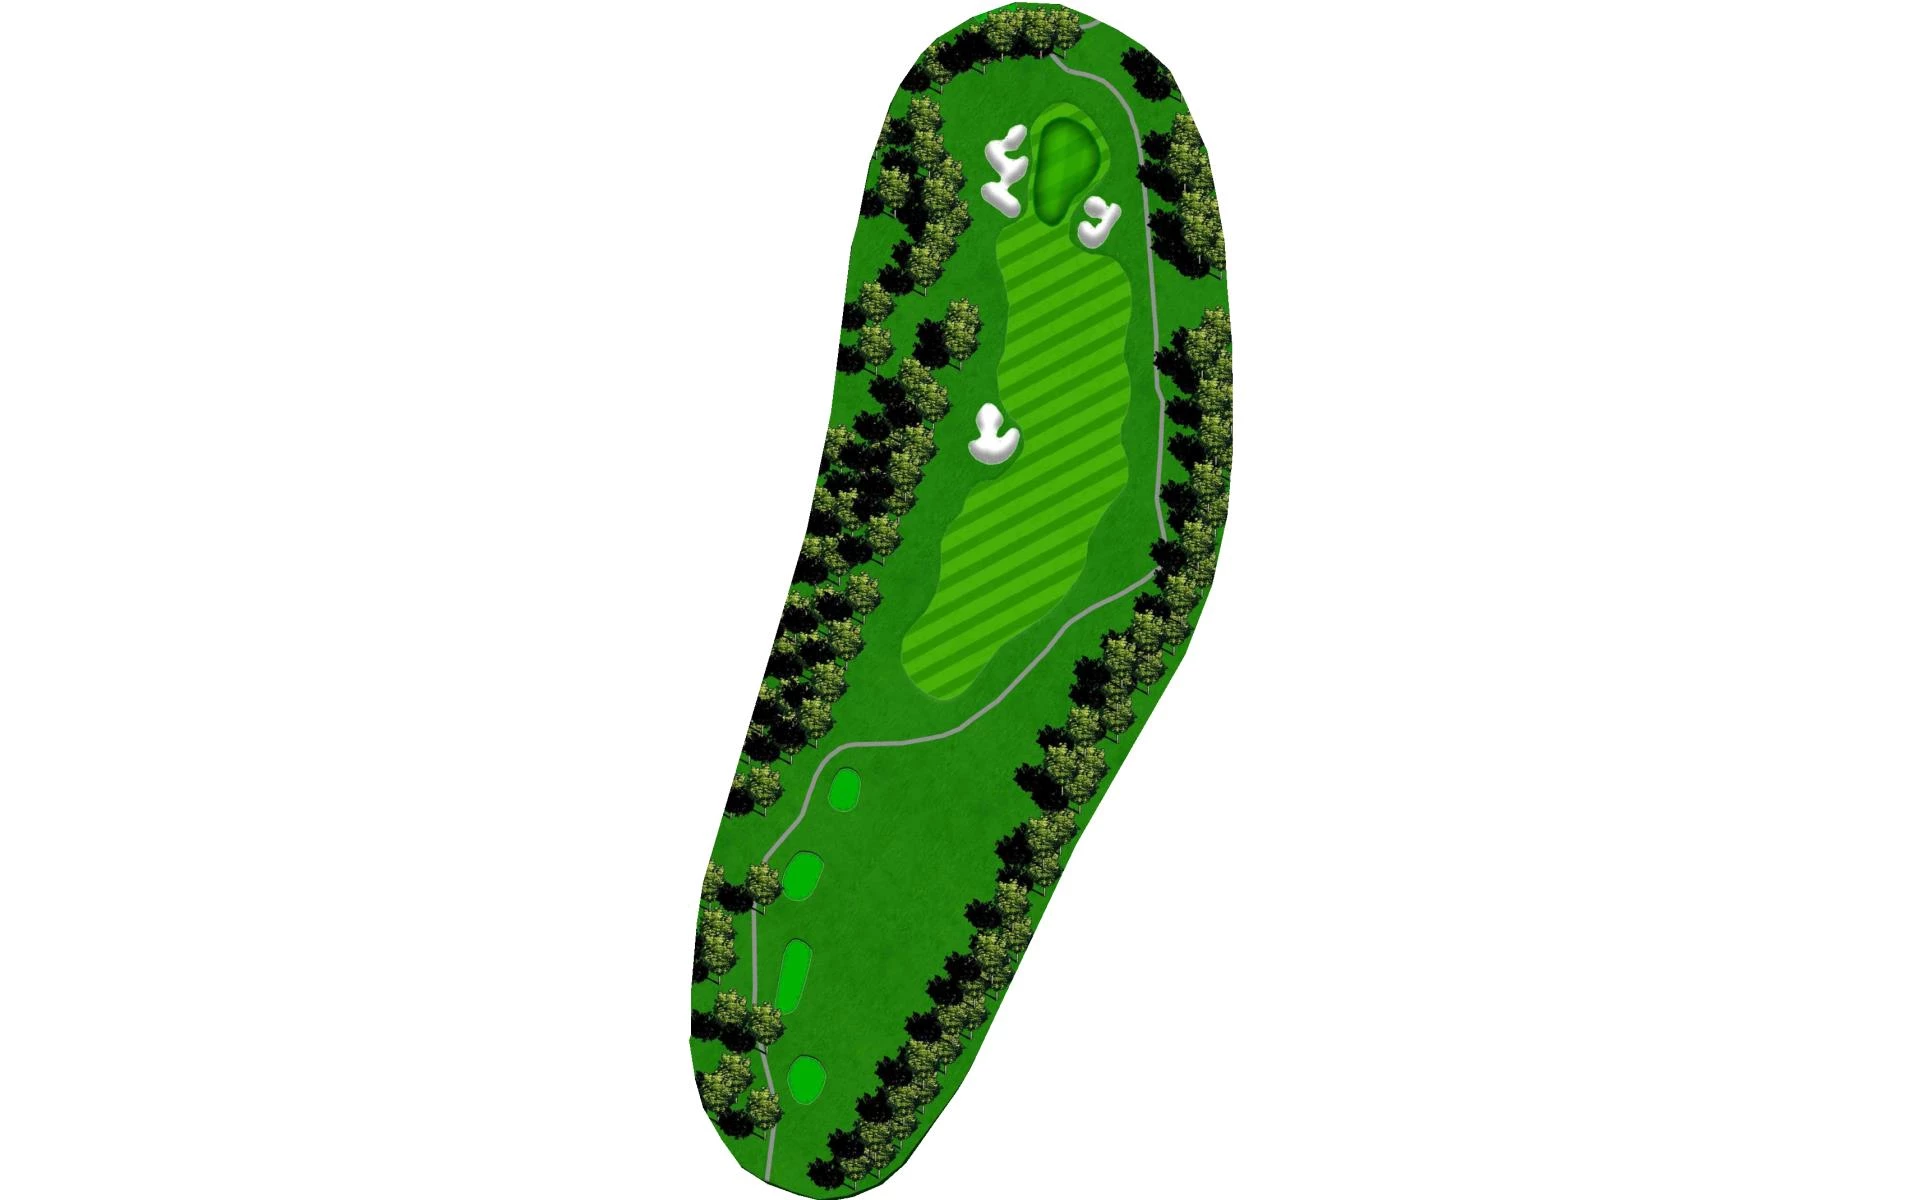
This slight dog leg left par 4, requires a tee shot up the middle or right side of the fairway. A long hitter can be aggressive and go over the right edge of the bunker. A good tee shot leaves you in a spot to attack with a wedge in hand.
# 16 /
Par: 3
Handicaps:
Men's 17
Women's 15
Yardage by Tee:
GOLD 109
BLUE 91
WHITE 86
RED 86
Slope:
Gold-111 | Blue-107 | White-Men:102, Women:103 | Red-102
Pro Tips
Hole 16 has the narrowest green on the course with a bunker both short and long. Aim your short to mid iron in the middle of the green if you wish to keep the ball from running off the back.
# 17 /
Par: 4
Handicaps:
Men's 5
Women's 3
Yardage by Tee:
GOLD 310
BLUE 274
WHITE 237
RED 237
Slope:
Gold-111 | Blue-107 | White-Men:102, Women:103 | Red-102
Pro Tips
This straightaway par 4 is a long hitters dream. With a wide-open landing area players can just swing away. For those of you who want to play safe, a layup short of the bunker will leave you with a short iron into the green. A good tee shot, and this is a birdie hole.
# 18 /
Par: 3
Handicaps:
Men's 7
Women's 9
Yardage by Tee:
GOLD 166
BLUE 148
WHITE` 124
RED 124
Slope:
Gold-111 | Blue-107 | White-Men:102, Women:103 | Red-102
Pro Tips
The final hole is the hardest par 3 on the course. With a forced carry over water, aiming right and playing a right to left shot is ideal if you wish to avoid all the trouble that surrounds this green.